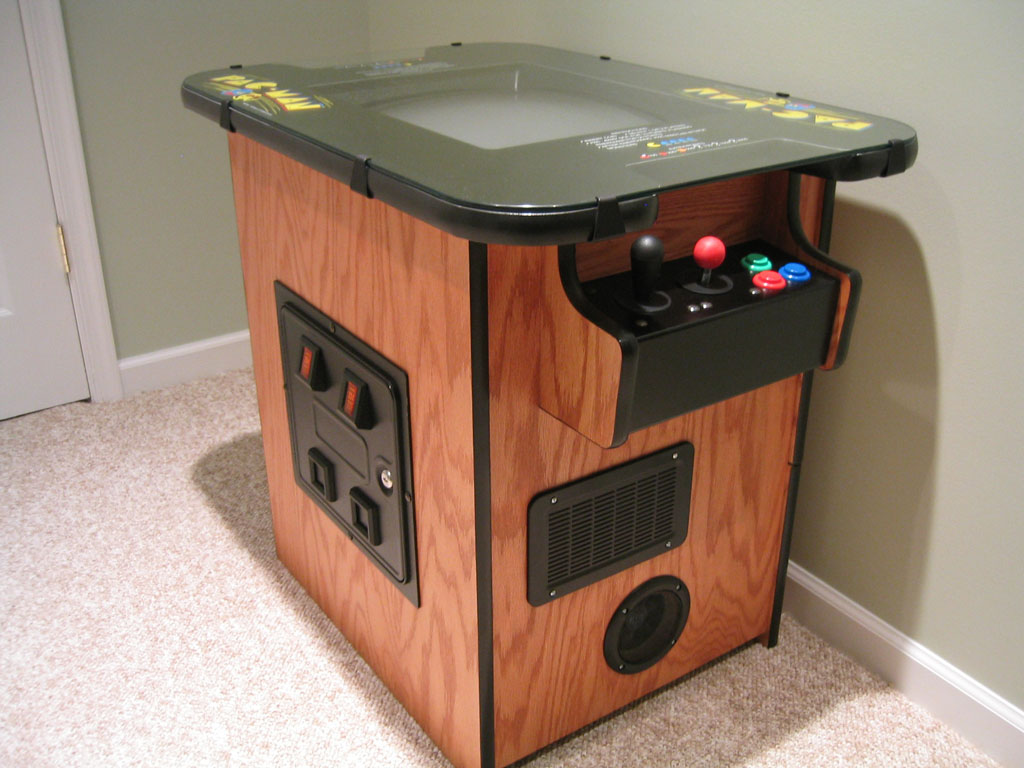
currygoat's Pac-Man cocktail arcade cabinet
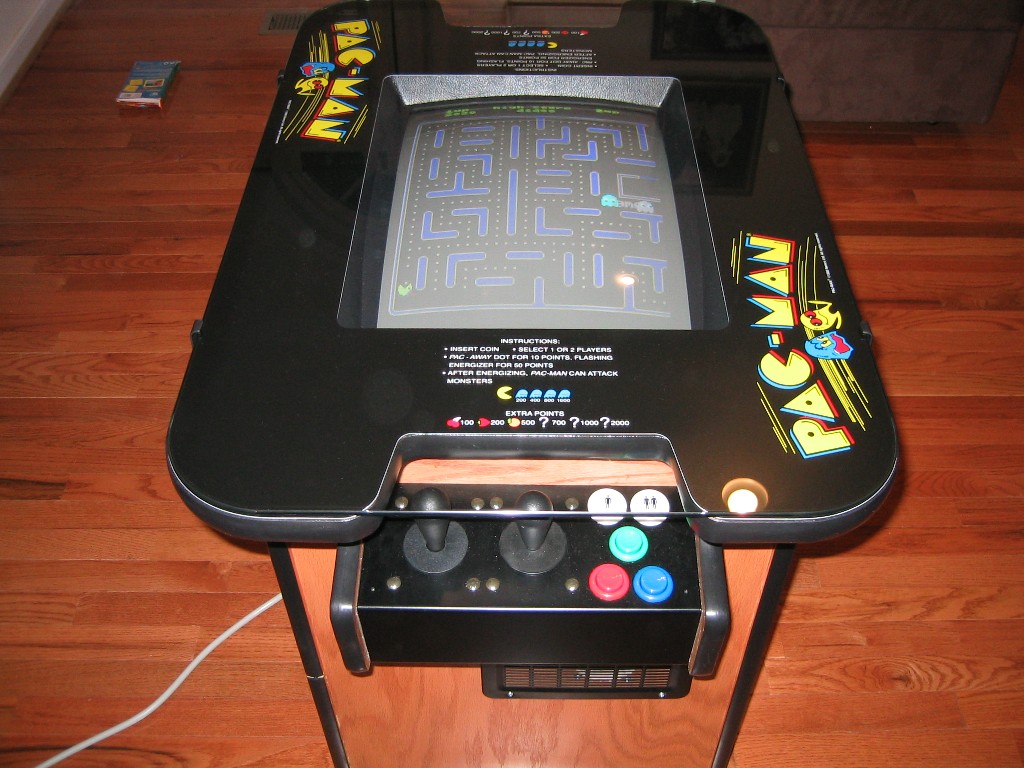
Update 08/26/05 - replaced Happs Ultimate 4-way joysticks with Happs Reunion MS Pac-man/Galaga red-knob 4-way joysticks
I have been aware of the amazing MAME emulator for many years now. But one day, out of curious boredom, I discovered a few hobbyist websites dedicated to detailing the progress and construction of a MAME arcade cabinet. Of note were:
“The Pac-Man Cocktail Table Project”
“Whammocade”
“Aaron’s MAME’d Millipede Project”
Wow I was impressed. Yes it costs lots of money, but it was too cool! Then I discovered the BYOAC (Build your own Arcade Cabinet) forums and became hooked. I would build my own arcade cabinet. “We have the technology … we have the capability” … “make it so!”
What to do? What to do? There are so many alternatives. What are my requirements? This is a fundamental question you have to ask yourself. What will fulfill my desires?
I began to realize that I would like to own a cabinet which was close to the same form as an original 80s classic. There is a feeling of nostalgia associated with some of the old arcade classics, notably Star-Castle, Space Invaders, Punch-Out, Track and Field and Pac-Man, these being some of the arcade games of the 80s that I loved.
Next, I knew the wife wouldn’t exactly like the idea of an arcade monstrosity sitting in the house. It would have to be something which fits-in, and provides just a little bit of practicality.
A cocktail style cabinet (the one which doubles as a table, with players on each side) would be more suitable for me. I knew it would limit me mostly to vertical oriented games, but I also knew I could letterbox the small suite of horizontal games that I really had to have.
Although I didn’t formally compose a list of requirements in the beginning, it’s safe to say they would have looked something like this:
- Cocktail style cabinet
- Be able to play most vertical games that MAME emulates
- Approaching some authenticity to some original 80s classic
- Try to keep it simple
- Avoid woodworking as much as possible
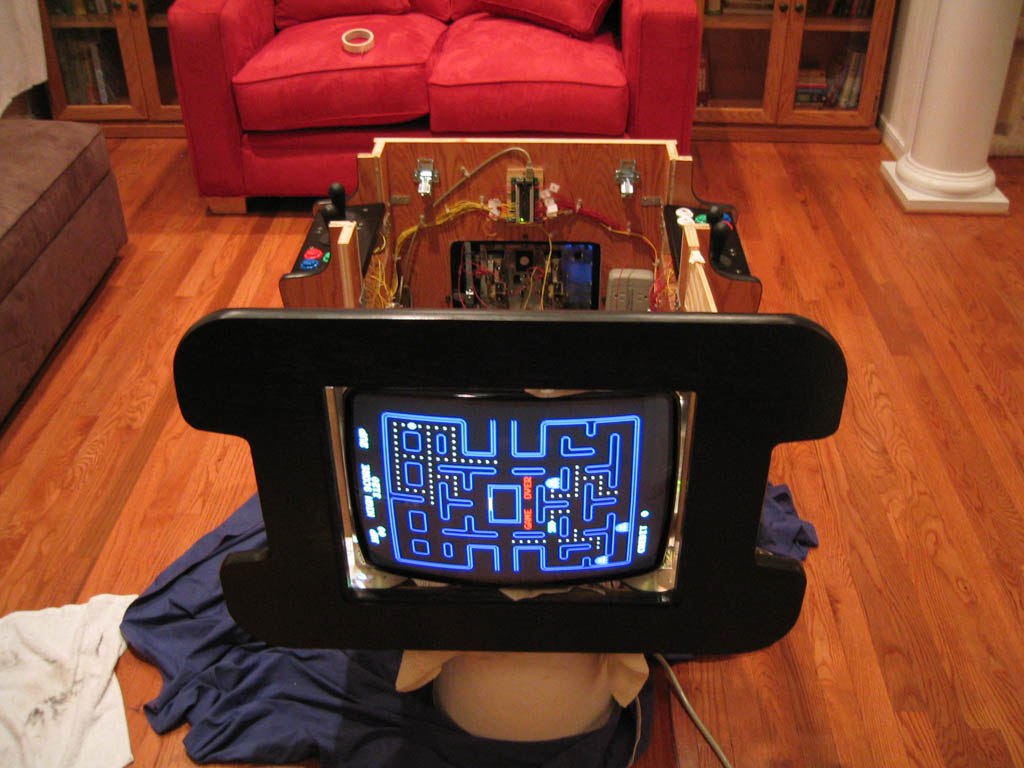
I finally ended up choosing Pac-Man as a theme for the cabinet. Pac-Man is a classic, and the availability of Pac-Man cabinet kits and artwork was readily available from internet companies. I would go with Pac-Man. It will be good.
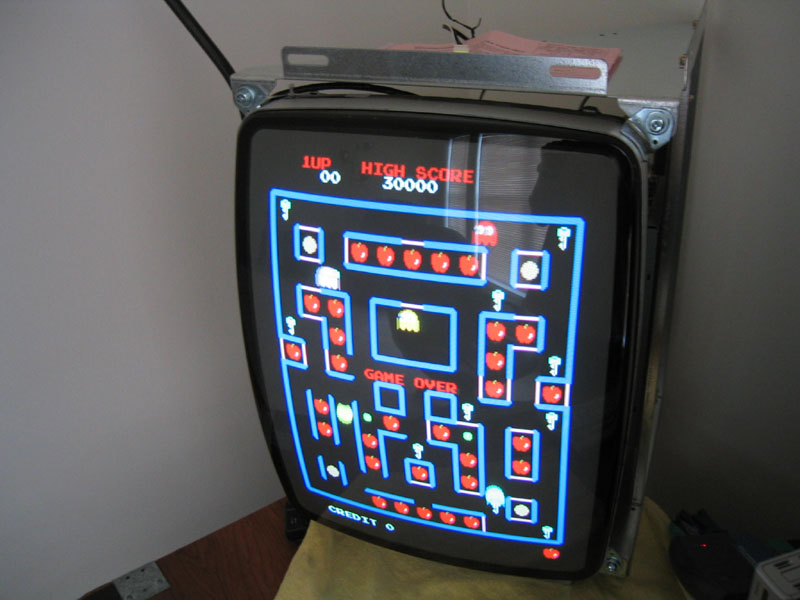
My first investigation into building cocktail cabinets landed me at Daves “The Pac-Man Cocktail Table Project” website. Since my project was going to share a lot of similarity, I culled some vital information from his site. I highly recommend reading Dave’s website, it contains a lot of useful information for cocktail cabinets. Dave ended up selecting what is known as a ‘hybrid’ monitor, one which could not only give you the lower frequency scan rates resembling the cabinets of the 80s, but also could plug right into the VGA port of a PC with no tricky connections. Now just to be clear, this monitor cannot run at the true arcade refresh rates of 15.75KHz. This monitor's specifications are 30 - 38KHz horizontal / 50 - 160 Hz vertical.
Running a PC monitor was a choice. But I knew right off the bat, I wanted a larger degree of authenticity. I wanted that lower resolution curved monitor like the originals had. I know it’s a bit silly, but somehow I wanted that more antiquated feel. So I decided I’d purchase the new lower resolution, curved ‘hybrid’ monitor. I went ahead and ordered the monitor way ahead of time, from happcontrols. It is a Vision Pro 19" Horizontal Mount SVGA Monitor (model 49-1337-VP2).
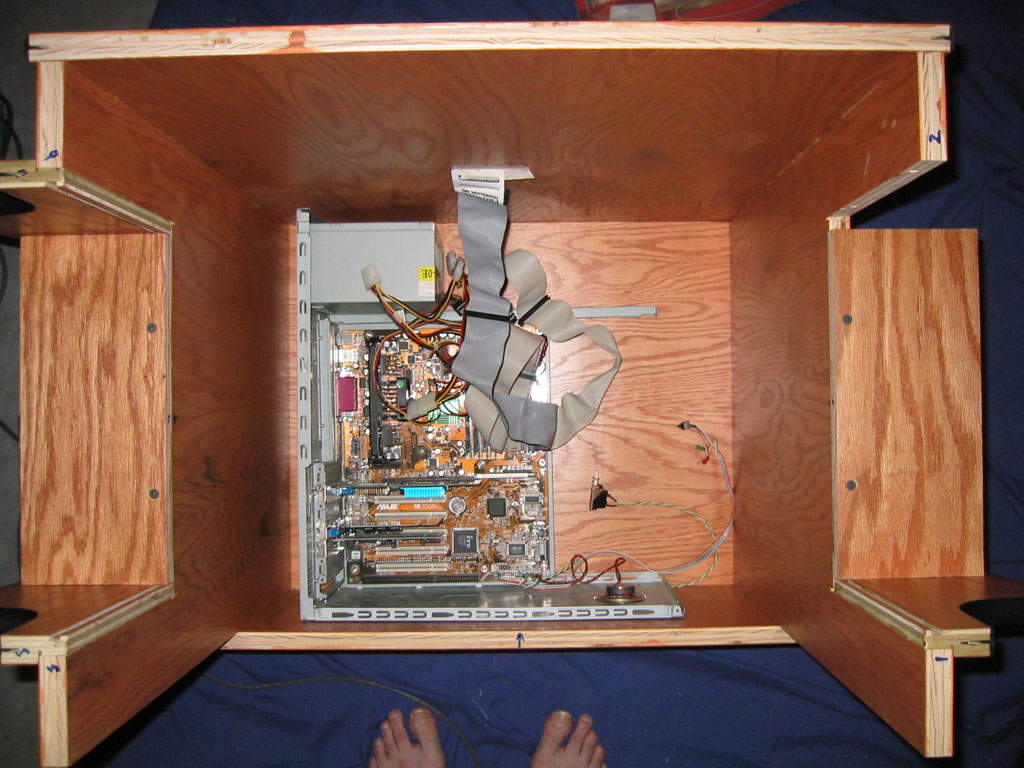
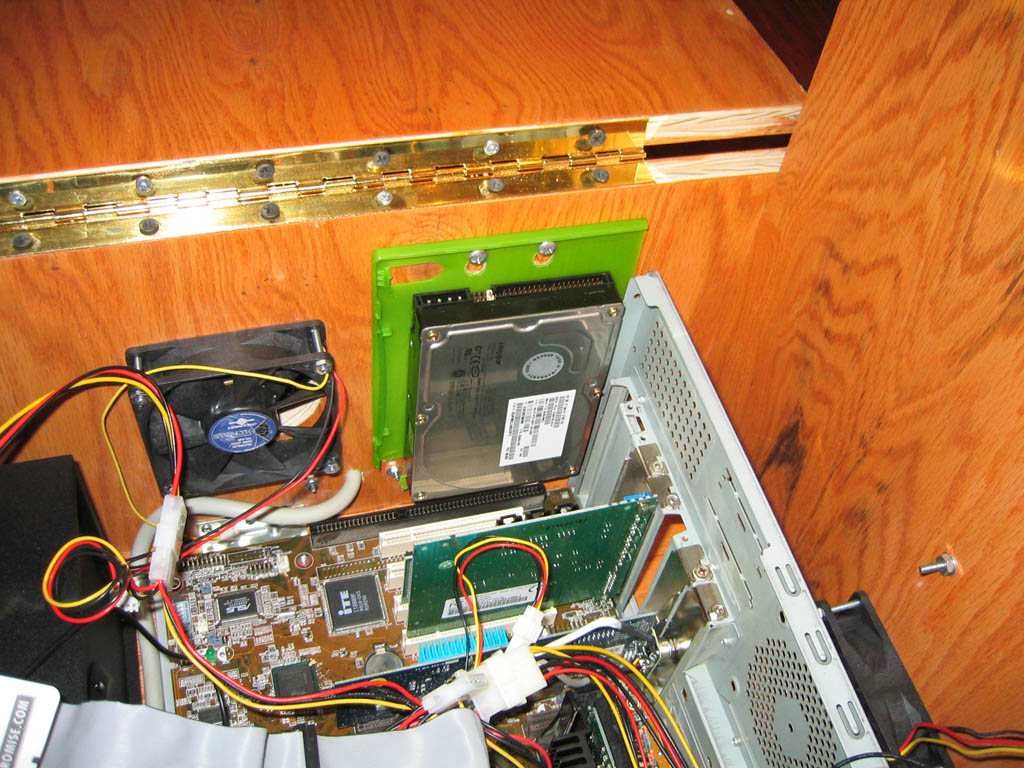
I started out with my old trusty PII-450 computer. It was running an antiquated version of Redhat (7.1 to be exact). I started to tinker with this and run games on it, but eventually I decided I’d like to get a slightly beefier machine to run some of the more recent ROMs.
I purchased a PIII-667 from a friend for $125. I installed 192MB of RAM, and I migrated my Nvidia Geforce 4MX card to it. The motherboard is the Asus P3C2000. I later purchased a 886Mhz Slot 1 SECC2 P-III processor and installed that to give me more boost.
The computer case was pretty bulky. In order to minimize the form-factor, I ended up with just the motherboard, resting on a part of the frame, and only the back of the PC case to support the cards. To do this, I had to drill out a bunch of rivets from the PC case just to dismantle it.
Being a computer nerd, I figured I’d start with the guts of the contraption (the PC) and work my way out. At least I was pretty comfortable with this aspect of it. If I could just get a PC going, a simple to use “black-box “which upon power-up would allow the player to choose from a list of games, select the game, play and provide an intuitive interface - that would be even more motivation to push forward.
The choice of OS brought to light another condition:
- Don’t use a Microsoft OS
I admit there’s a “cool factor” for running Linux. So I had to do it. Partly for the cool factor. Oh and also because Microsoft would be too easy. Yes I realize that goes against one of my requirements, but linux is also an environment which would afford me the most tweaking and customizability (special tweaks to MAME itself even). I have dabbled in linux for years so that would prove to be helpful. So I first started to tinker with the Redhat 7.1 install I had nurtured for at least 2 years. Hit several roadblocks getting various software packages to compile/run properly. Finally concluded the OS was just too old and didn’t have the necessary prerequisites for a lot of the software I was compiling. Rifled through my linux distros and found some unused Mandrake 9.1 install CDs. Dated much more recently than Redhat 7.1 so I installed it fresh on a different hard drive. This OS ended up being my final choice. Note: I later discovered there exist custom linux distros for the purpose of running Mame. Googling around for KnoppixMame or Gentoo MAME is a good start.
In the world of linux you have many choices. For one, there are different graphics libraries you can utilize to run MAME. You can run in X, in the SDL graphics library, in the svgalib library, in frame-buffer and probably several others.
There are also different variations of the MAME emulator itself. There is the vanilla xmame source tree, and other more specific variations of MAME.
Xmame.svgalib runs from the linux console. You do not need to have the X Windowing environment up and running. It is purported to be one of the fastest graphics libraries available for linux. AdvanceMame also runs from the console and is a specialized version of Mame designed to run at special frequency scan rates, and it is also suggested it utilize the svgalib library.
It came down to whether I wanted to run an arcade monitor true to the original monitor frequency scan rate specifications that the game wants. Running games this way (using AdvanceMame) would provide the closest experience to the actual arcade game, as the game and monitor scan rates would be working at the same frequencies as the original hardware of the original arcade game.
The downside of this approach (as I found out) is the complexity involved in the technical configuration of monitor scan lines for your video card and monitor. Aaron’s Millipede Mame conversion project was able to get it to work successfully, but I encountered problems. I tinkered with AdvanceMame and its supporting configuration utilities with my hardware. I encountered issues, some I believe rooted in the fact that I’m using an NVidia chipset. Aside from the specialized frequency scan rates which AdvanceMame supports, it does offer other small improvements above what MAME offers.
But due to my issues with my video card, and my configuration frustrations I eventually abandoned this approach. I can live with not running MAME at the perfect frequency scan rates. The only disadvantage is what is known as “tearing”. This is most apparent in scroller games (Xevious for example) where you’ll notice graphic anomalies which ripple up the screen every few seconds. It doesn’t ruin the experience, but certainly isn’t ideal.
The standard xmame codebase allows you to compile MAME for several graphics libraries. Svgalib ended up being the best and most capable graphics library for me. I downloaded and installed the library itself. Then downloaded and compiled Xmame for this library. I immediately hit roadblocks with “svgalib_helper”. After more research I determined that I needed to insmod the svgalib_helper.o file into the kernel on startup. After this, my initial tests of xmame.svgalib were very positive. Pac-Man came up, full screen in the linux console. Sound worked well also (with the installed Sound Blaster 128 PCI card). My final choice was xmame.svgalib (based on MAME version 1.86)
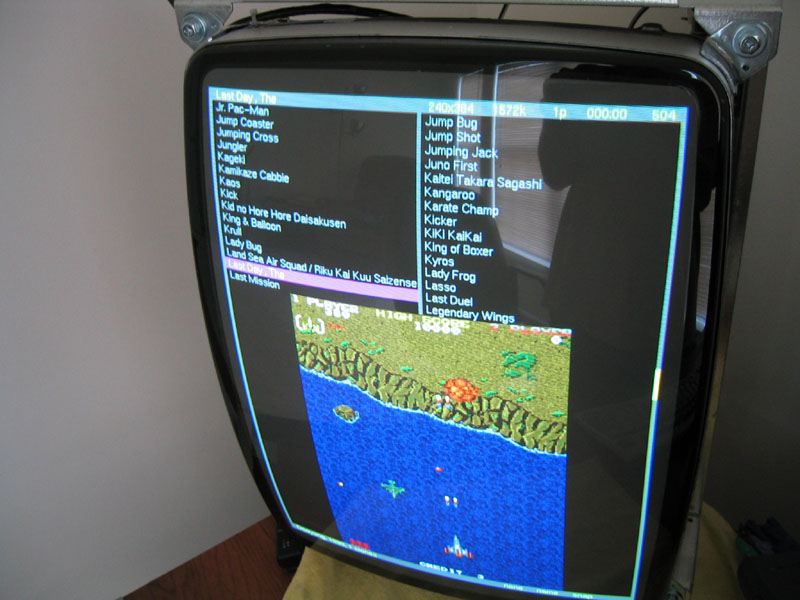
After my failed attempts to get AdvanceMame working properly, I noticed the same author created a Front-end called AdvanceMenu. It is a very mature and flexible front-end. It allows favorites, sort options, screen snapshot screensavers, background music, sound effects and a lot more. I couldn’t get it to jive well with svgalib with my hardware, so I compiled it against SDL and it worked pretty darn well. This ended up being the front-end of choice.
I do remember spending a good deal of time removing all the unused roms from the AdvanceMenu .advance/xmame.svgalib.xml file. This file is used by AdvanceMenu to obtain all the specific rom attributes. Removing the roms allowed AdvanceMenu to startup faster. I ended up writing a small C program which given the name of a rom, would search the xmame.svgalib.xml file and pull out the content just for that rom. Then I wrote a bash script which simply looped through all my roms in /usr/local/share/xmame/roms and pulled out all the rom data into a new xml file. All this to get the frontend to startup faster :)
I did end up modifying the color scheme to my liking (the ugly white default background was not good). I went ahead and inserted all of the game screen snaps, so the frontend would not only display the games snapshot in the menu, but also enter a ‘screensaver’ mode displaying these images at random. Also I configured a “Favorites” group for my favorite games to go. I did some additional key remapping to allow me to overload a lot of my button inputs to fire events in the frontend itself. See the I-PAC section for a little more detail.
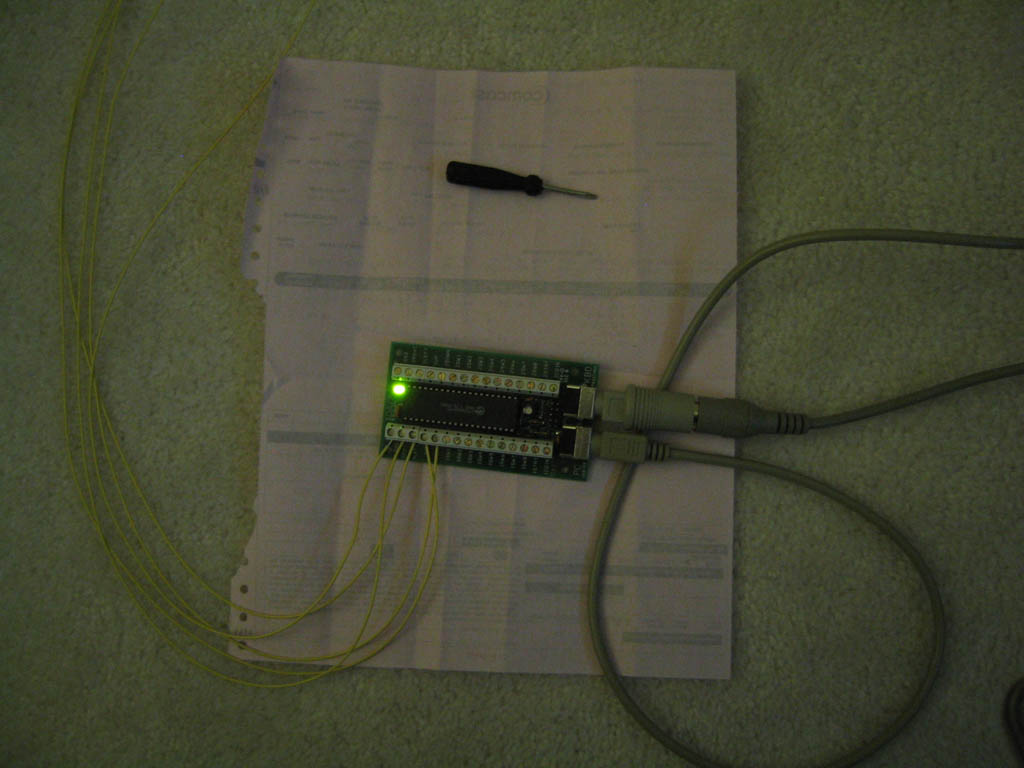
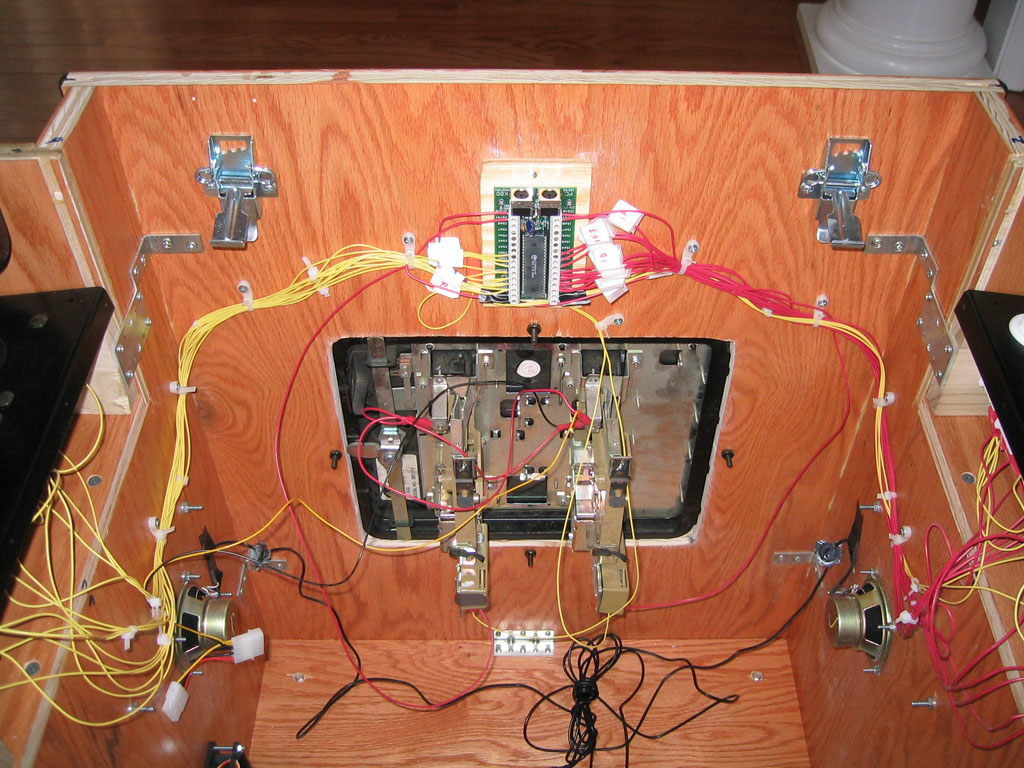
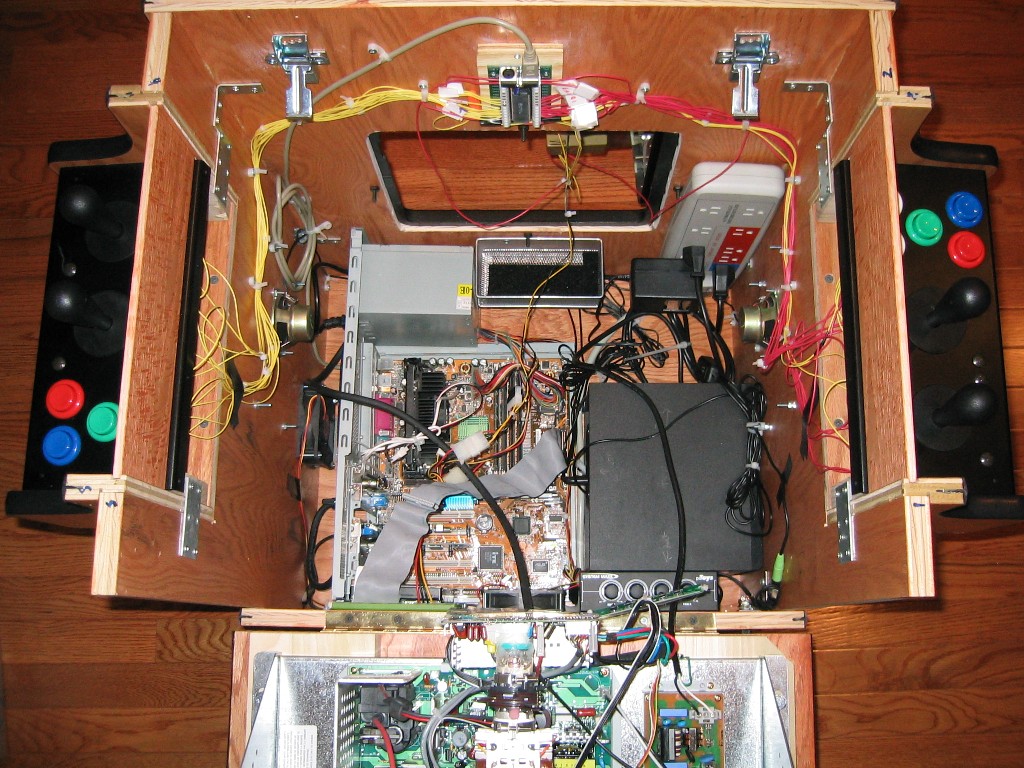
Dave’s website refered to the I-PAC peripheral, which is designed specifically for intercepting control panel signals and translating them to keyboard presses. This was the obvious choice for me. I knew I would have 2 fairly simple panels on each side of the cabinet. I would have a maximum of 3 ‘fire’ buttons for each player, and 2 joysticks (1 4-way, 1 8-way) wired together in parallel, sharing the same circuit. For this setup, I would need the basic offering: the I-PAC 2. They’re shipped from Ultimarc and are neat little inventions. They allow key customizations, and also remember your settings in EEPROM. It also comes with specialized software which makes it easy to program. Highly recommended, and obviously a fundamental part of the system.
Well it’s not extremely complicated really. I wanted a few customizations done. I wanted it so that I could use the Shift-key feature of the I-PAC to allow certain key presses to allow me to do things, like pause the game, enter the Mame menu, sort the game list in the frontend, add to favorites etc. I used a spreadsheet to map out what I wanted the inputs to be. For example, holding down 1-player start and Fire1 will insert a coin. Holding down 1-player start and Fire3 will pause the MAME emulation. This effort was made especially easier by the fact that the AdvanceMenu configuration allows any keyboard input to control any feature of the frontend. I was able to modify the default AdvanceMenu key of F12 which normally pulls up the selection to run a clone, to switch it so if you pressed space bar, the frontend would perform this action. This way, MAME Fire button 3 (normally the space bar) is overloaded to mean one thing in MAME and another in AdvanceMenu. This is just one example.
What else did I need? Well I went through the effort of acquiring nearly every vertical ROM, in addition to screen snaps of every game. I loaded all of these roms until I had AdvanceMenu coming up nicely.
The next step was to configure linux so that it would enter the menu upon startup. This was a matter of using the --autologin feature of rungetty. I downloaded rungetty and installed it, and after an hour or so, I had the machine logging in as user “mame” and automatically invoking Advancemenu.
Next was the ability to allow the player to exit the menu and halt the machine. I first gave permissions for the ‘mame’ user to invoke ‘halt’. Then I wrote a simple prompt program which runs after the frontend exits. It asks whether you want to shutdown or re-enter the menu. I figured pressing the 1-player button would halt, 2-player would re-enter the menu. Also wrote it to timeout waiting for user input and re-enter the menu. I hooked this simple program into my .bash_profile, calling the frontend also in a loop and I was done. Source is provided here. Yes, the text appears sideways when you’re playing the cabinet (since the monitor is oriented vertically). No biggie.
Also found a nice piece of Mame artwork to display as my linux boot splashscreen. Took a little of tinkering to get it to display properly.
MAME hiscores are supported via the hiscore.dat file you can find at www.mame.net. I also had to make sure the 'nvram' directory was present to allow for other high-score saving functionality. This is a directory in which MAME writes the information which the game keeps in memory. This is required for some games.
Now that linux is all configured, it’s a relief. But I will say, there were frustrations along the way. I experienced nagging technical issues a lot. Like the auto-login feature; it seems to take 8 seconds for the box to actually auto-login. Never figured out why. I had some temporary sound issues. Also fussed with the svgalib configuration file for an hour or two.
Along the way, I “ghosted” the drive image so as to not lose anything. It’s vitally important to have an image backup of your MAME system.
On the bright side, I did two cool things with Mame and AdvanceMenu:
- recompiled Mame to not display the annoying warning that the Graphics and or Sound is not 100% correct, press OK to continue. Was happening with Galaga and I couldn’t have that!
- Made small tweak to AdvanceMenu to display the year next to the game name during the screensaver. Very nice to have.
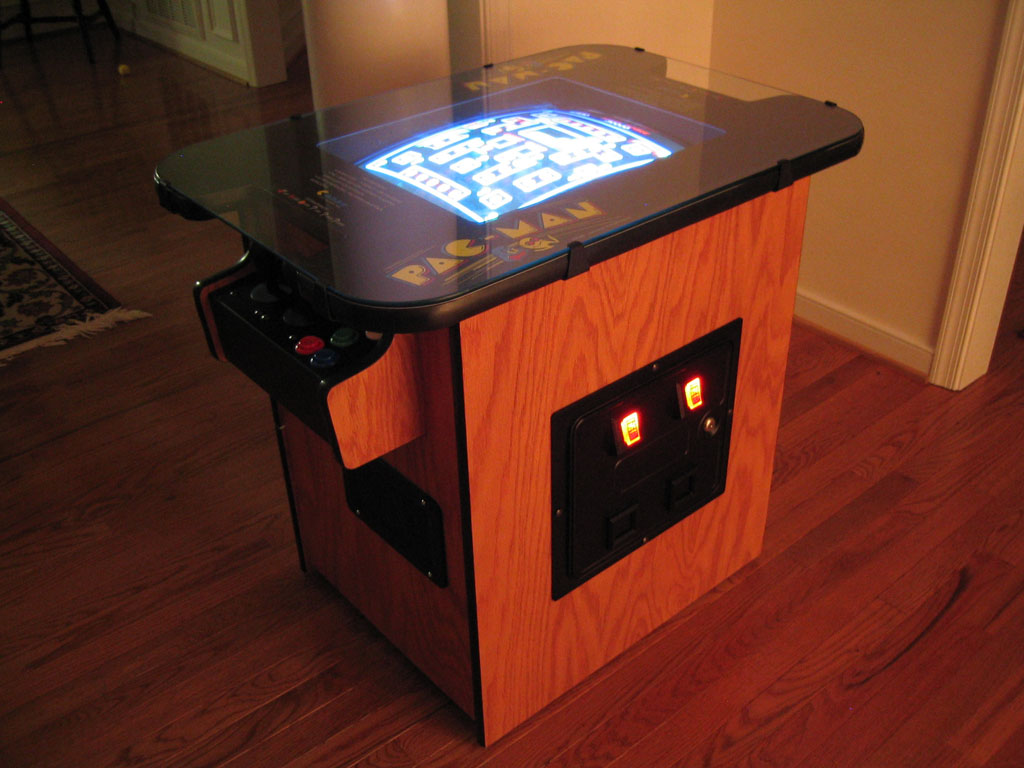
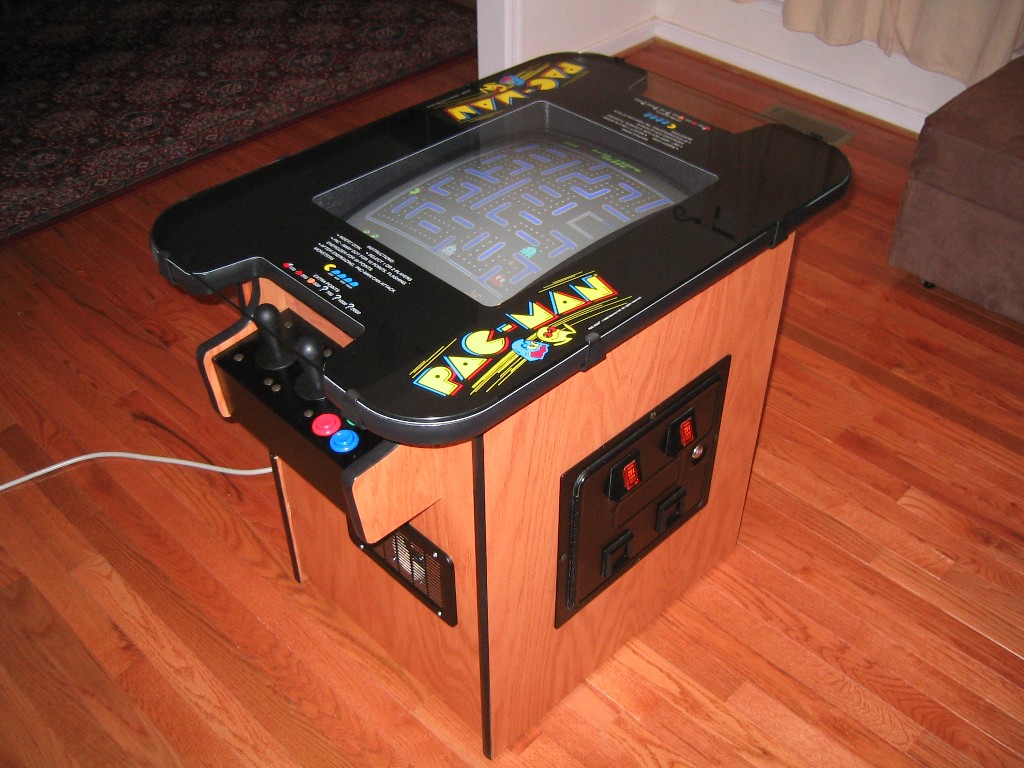
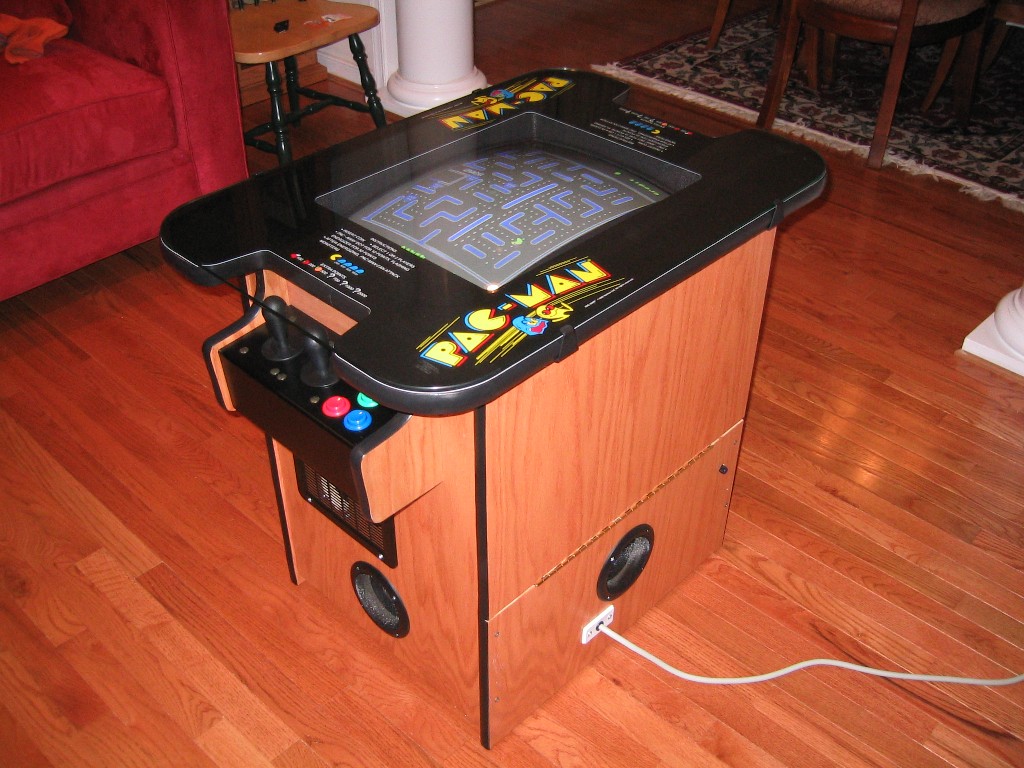
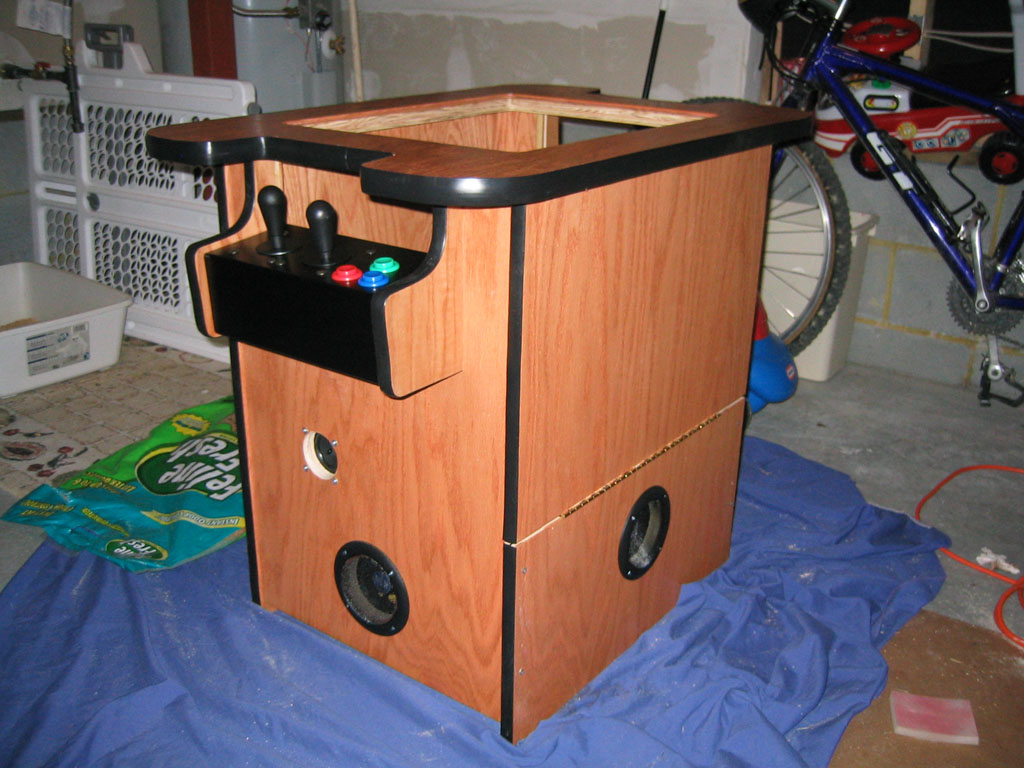
Well I’m honestly not an accomplished carpenter. And I hardly own any woodworking tools. Dave’s website had information about arcadedepot.com. They offered cocktail cabinet kits (assembled or unassembled), prestained, pre-t-molding and everything. It was the obvious choice for me to go ahead and purchase an unassembled cabinet kit from arcadedepot. They offered a Pac-Man style cocktail cabinet (Oak wood, Colonial Maple stain), with 11” control panels so I went with that. I also ordered the tempered glass top.
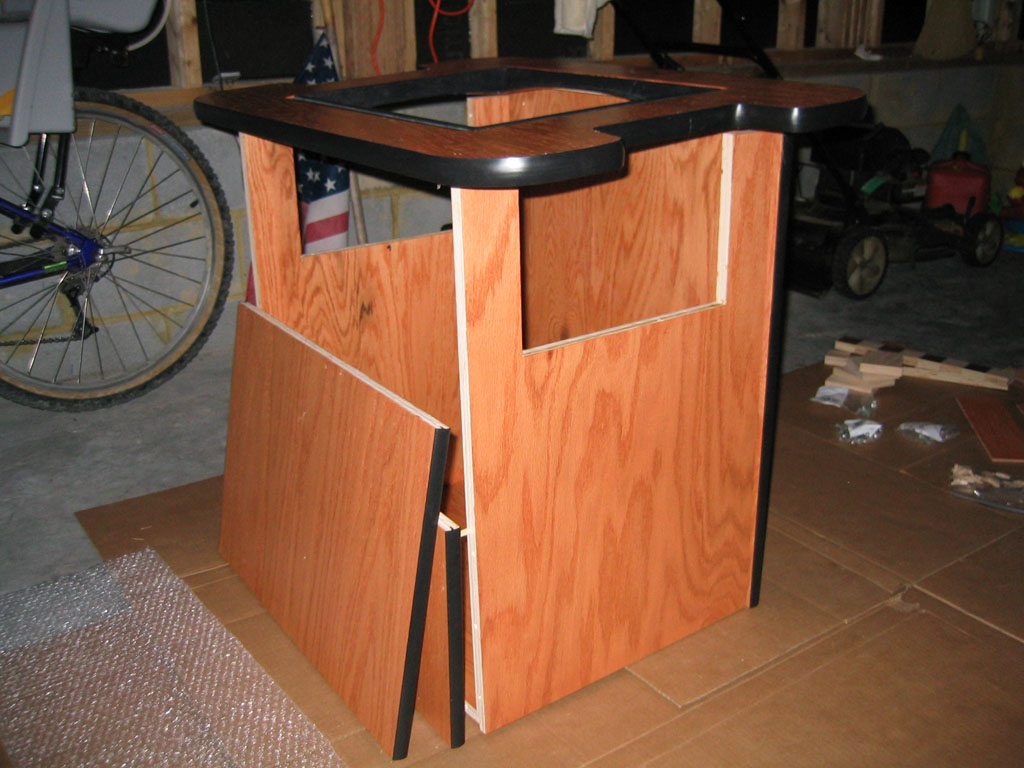
Upon receiving the package in the mail, I laid out all the pieces. It came with instructions. The construction involved mostly securing the pieces with wood glue and dowels. After a few days I had the bottom and 4-sides assembled. Next came the control panel bays. This was fairly straightforward. The next step was the attachment of the hinged-side via the piano-style hinge hardware. This was a pain to get to line up exactly, but eventually I managed to get it attached almost perfectly. The next step was the attachment of the cabinet top to the hinged-side. I spent probably 45 minutes making sure the top was exactly centered on the top of the cabinet. Finally I managed to attach the top carefully making sure I didn’t accidentally hit it with my elbow or something and have it be misaligned. In hindsight it would have helped a lot to have a clamp device to secure things.

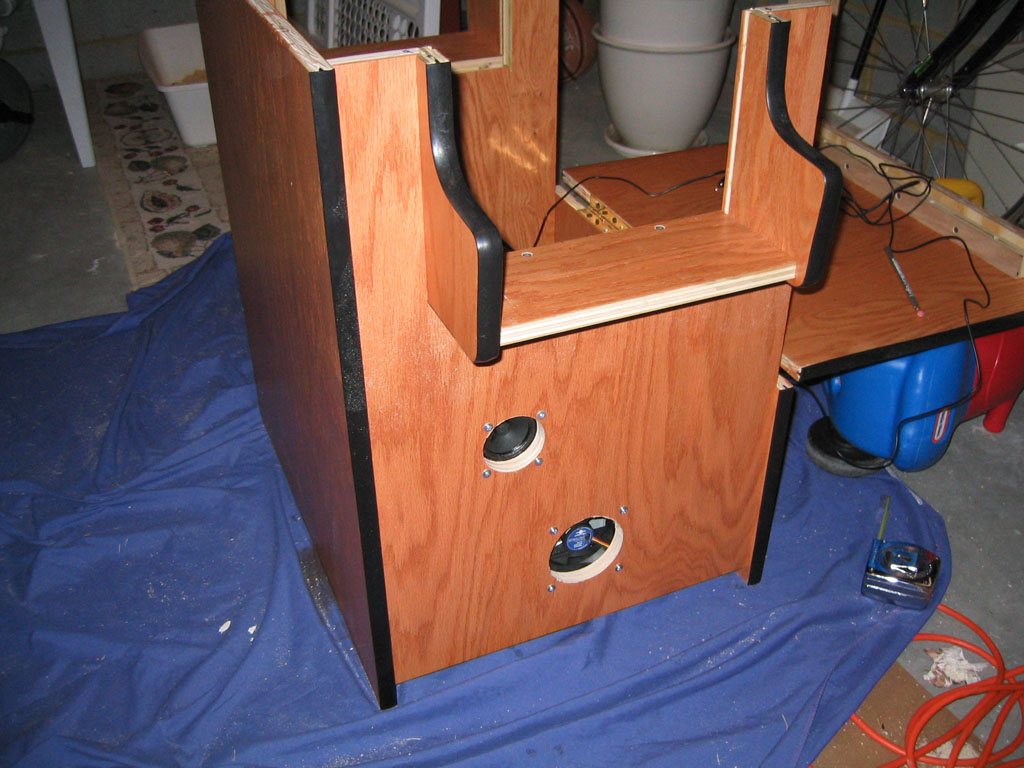
Now that the basic structure of the cabinet was done, I had to decide where to cut out the holes for the intake fan, exhaust fan and speakers. I decided the exhaust fan would go on the bottom of the hinged-side of the cabinet. The intake fan would go on the bottom of the 2-player side. I then used a jigsaw to cut out the holes.
For the speaker holes, I decided I’d pretty much do the basic thing. Put one small speaker on each player side of the cabinet under your knees. Fairly straightforward, so I purchased a large 3” circular drill-bit to cut these holes out, based upon the cheap PC speaker system I had purchased.
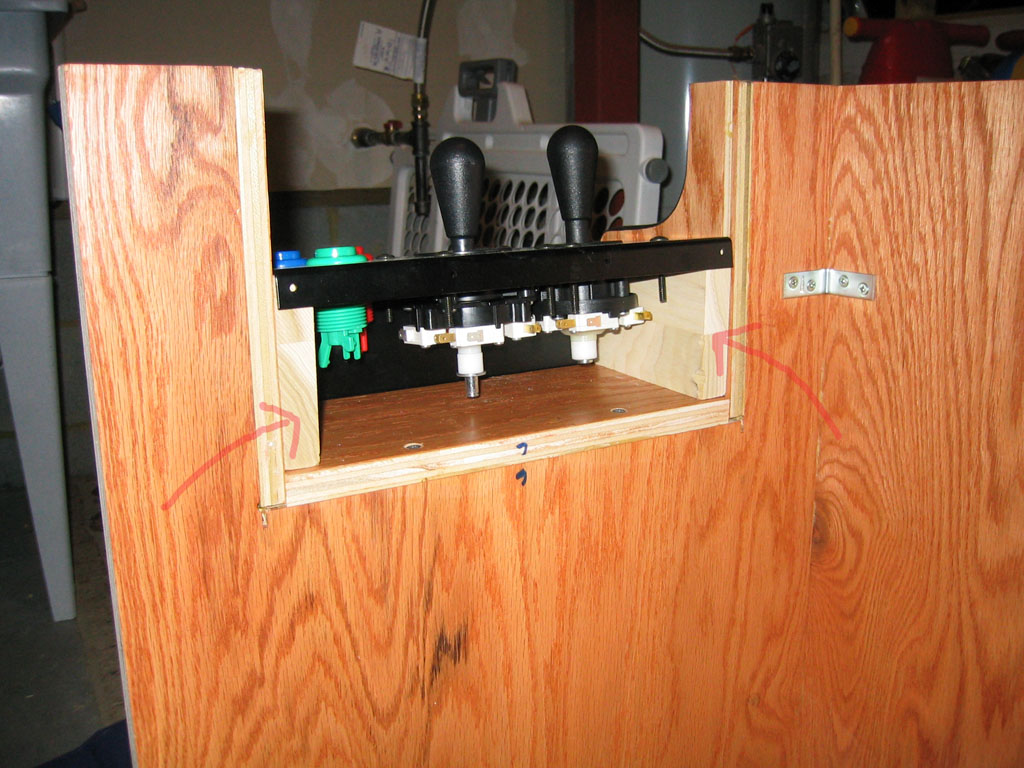
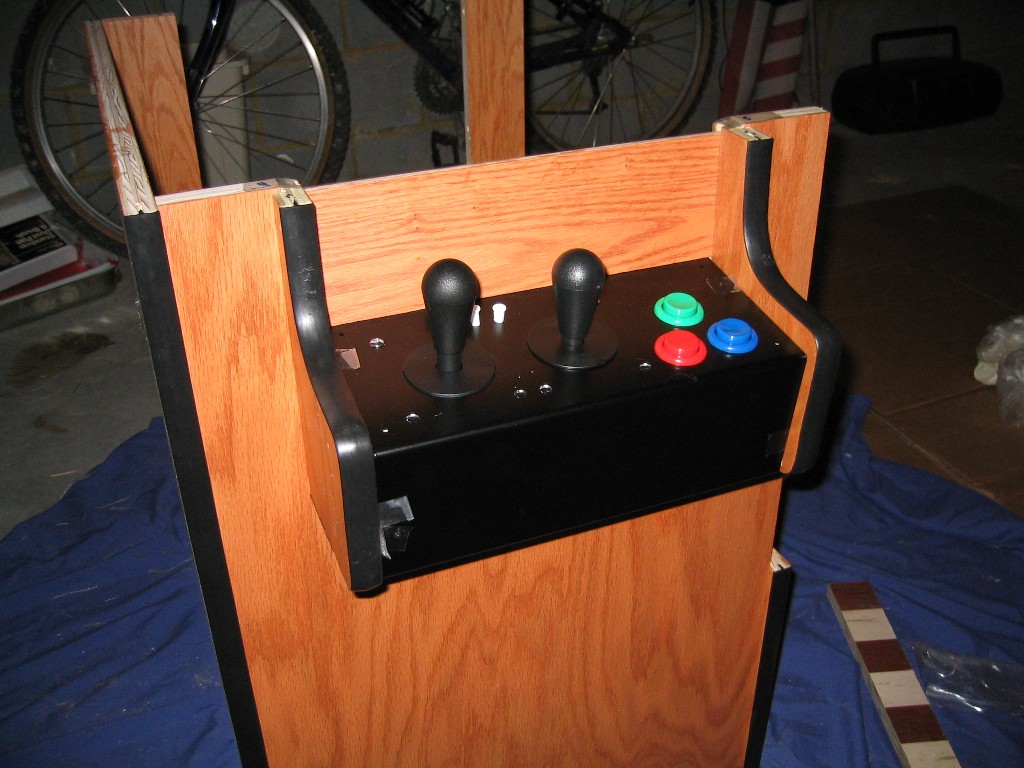
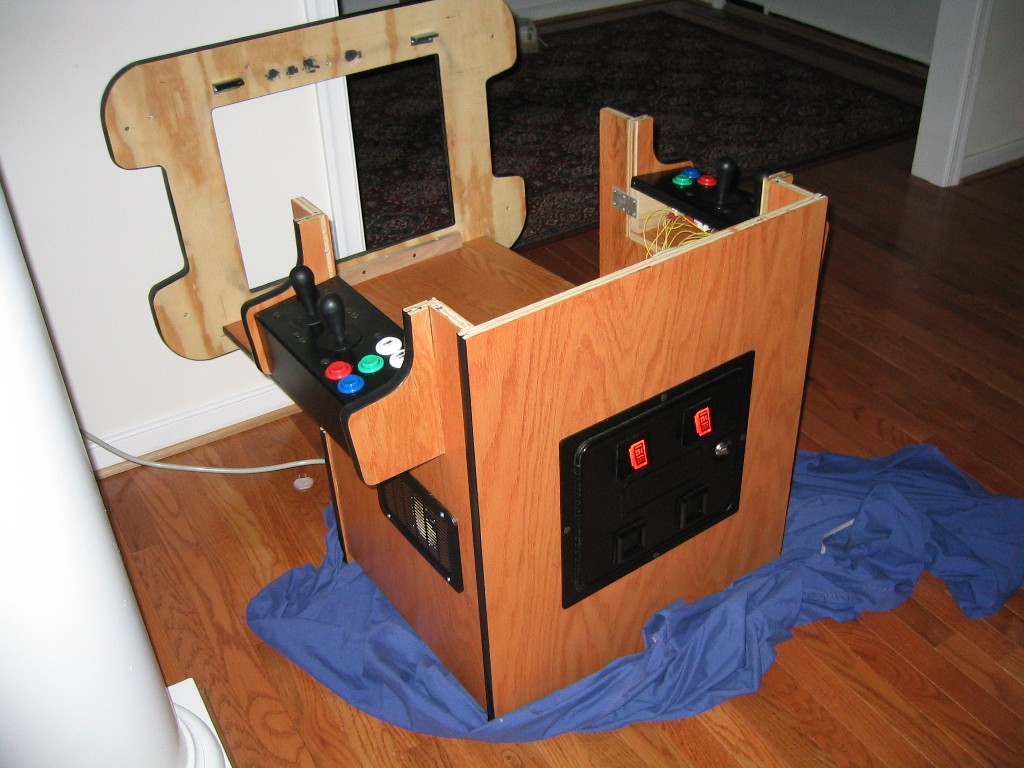
Next came the control panels. After experimenting with how the panels would attach to the panel bays, I really wasn’t satisfied with how they sat. The little wooden stabilizers which came with the kit, designed to fit on each side of the inside of the panel, ended up not raising the panel high enough. If I peered at the bottom of the panel, the panel bottom (where the little lip is with 3 screw holes) didn’t reach the bottom of the panel bay area. There was a gap there.
I decided I’d use some wood, and cut out my own custom panel stabilizers.
I used pieces of cardboard as guides, and after a few tries, I had the appropriate control panel stabilizer template. I then carefully cut some pieces out of some poplar wood. The first dry-run installation ended up being very successful. The panels are secure, and sit up plenty high for the bottom of the joysticks to not rub against the bay bottom, and also the panel lines up perfectly with the very bottom-side of the bays. I painted the edges black because I discovered the wood shows through in the crevice a bit where the side of the panel meets with the bay. The picture below shows the joysticks assembled incorrectly which I fixed later.
I toiled back and forth deciding whether I would need an external volume control mounted on the cabinet. I pondered ways in which I could adjust volume via software. Eventually I concluded an externally mounted volume knob was necessary, given the quiet sanctitude of my house late at night, and the ease for which my wife could just turn the knob.
I used the Oscar controls website as a reference. I drove to Radio Shack and luckily found the stereo potentiometer I needed. It was the "Stereo Volume Control, 100K dual-ganged with audio taper". I also purchased a few small-size plastic volume knobs to attach to it.
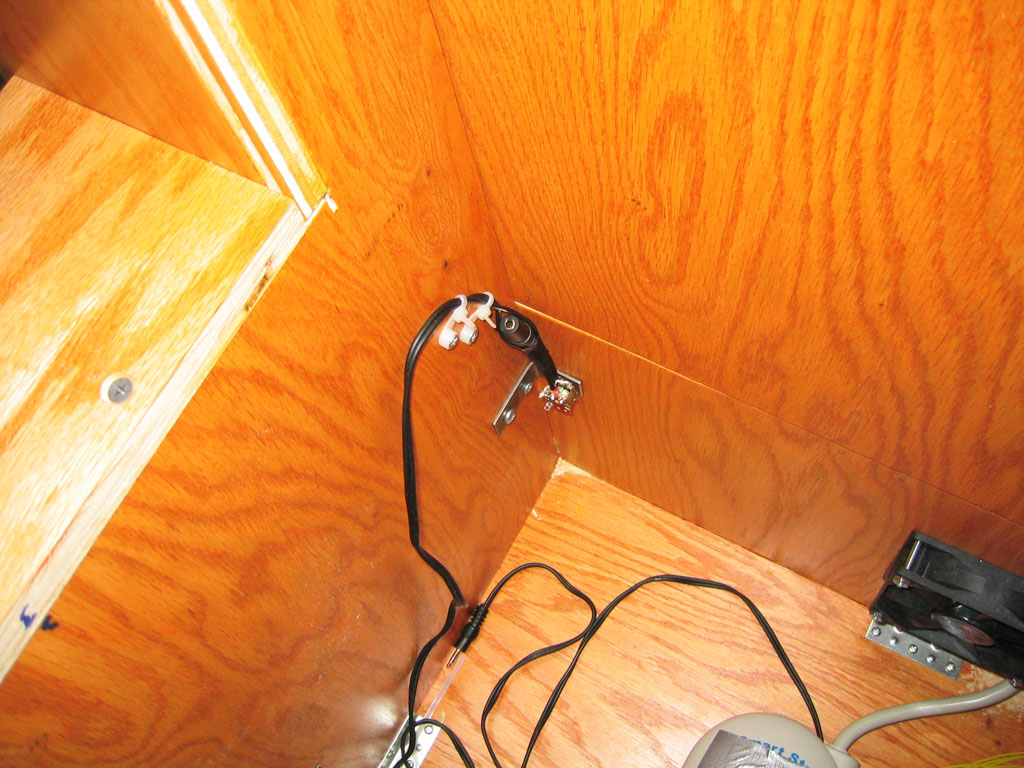
After I had this, I then contemplated how I would mount it. The rod on the control wasn’t long enough to fit all the way through the thickness of the cabinet. I tried to do what the site indicated, using an extension and a shaft-collar to extend the thing so the actual rod would poke out of the cabinet far enough to comfortably attach a plastic knob. Ultimately however, I decided what I would do is drill a hole for the potentiometer rod, then I would drill out a larger hole on the outside just a few centimeters deep to accommodate a small knob, which would then sit inside the wood a bit.
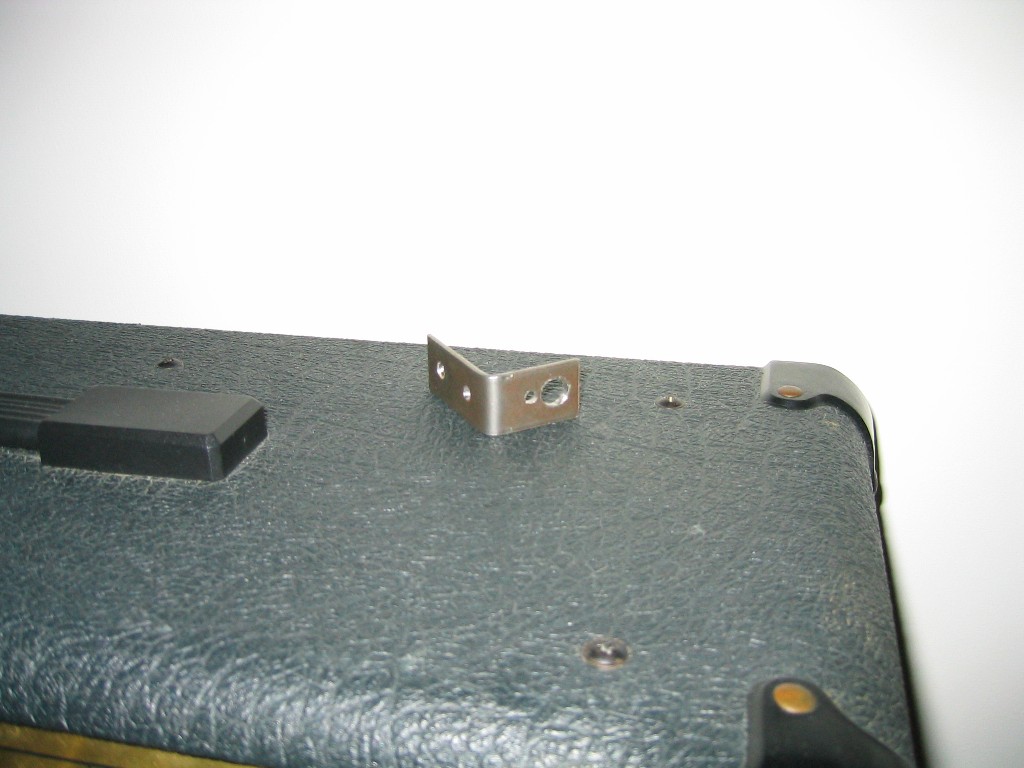
I fashioned a little bracket to secure the potentiometer on the inside of the cabinet. It is just a simple L-shaped bracket, and I drilled out a larger hole in it to accommodate the potentiometer. Things were looking hopeful.
I managed to salvage some old Y-cord headphone wires for the wiring. I figured out how to connect the wires to the potentiometer and control the volume based on the Oscar controls site.
I figured I would create a wire which would plug into the PC sound card output, extend to the volume control, and at the other side have a female plug for the speaker system to plug in. So this volume control would sit right between the PC sound card and the speaker system. I found some Y-cord headphone wiring with a male and female end in my house. I cut up the wire, and after some crude soldering, I managed to get the individual connections soldered to the potentiometers fairly small connection nodes to some degree of satisfaction. See the Oscar Controls site for more details. As long as I didn’t tug on the thing hard, it should hold.
I mounted the thing to the inside hinged-door side of the cabinet near the bottom, using the metal bracket I fashioned. The potentiometer rod ended up sticking out a little on the outside of the cab. The larger drilled out hole on the outside allowed me to embed a small volume knob just below the outside surface and secure the knob to the potentiometer rod with a small screwdriver.
With this in place, all I would do then is just plug in the male plug into the PC sound card, and plug in the speaker system into the female side with the volume control in the middle.

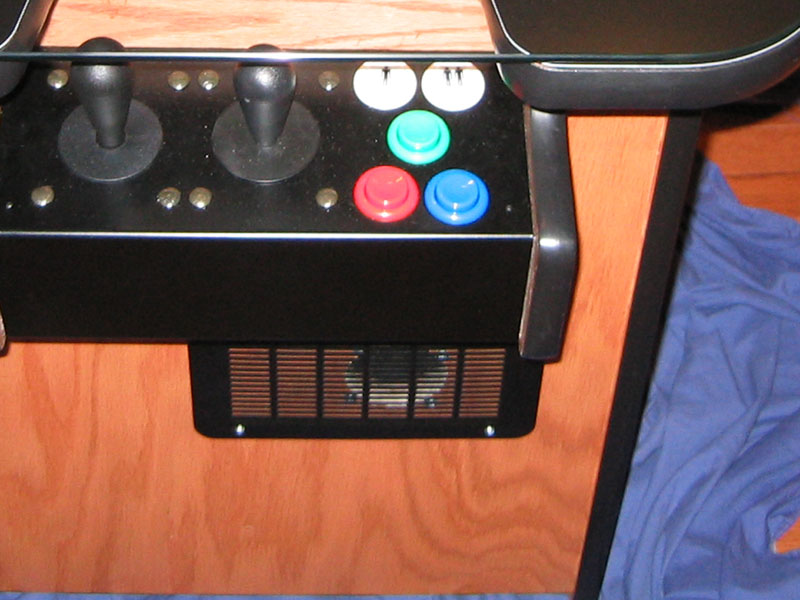
I ordered 2 11” metal control panels from arcadedepot. Dave had setup one 4-way and one 8-way joystick so I did that also. I decided on 3 main ‘fire’ buttons for each player. I’m aware of the switchable 4-way to 8-way joysticks where you pull upwards on the stick and twist it to alter the configuration. At the time though, I had decided on 2 joysticks mainly due to my inexperience, and had read that some games play funny with 8-ways. I have yet to really find a game, other than Q-bert which really needs the 4-way. Well that’s the choice I made at the time. I went with the Happ Controls 8-way Competition Joystick and the Ultimate Joystick 4-way from Happs.
I designed the control layout and emailed it to arcadedepot. For a nominal charge, they will cut out the panels to your specifications.
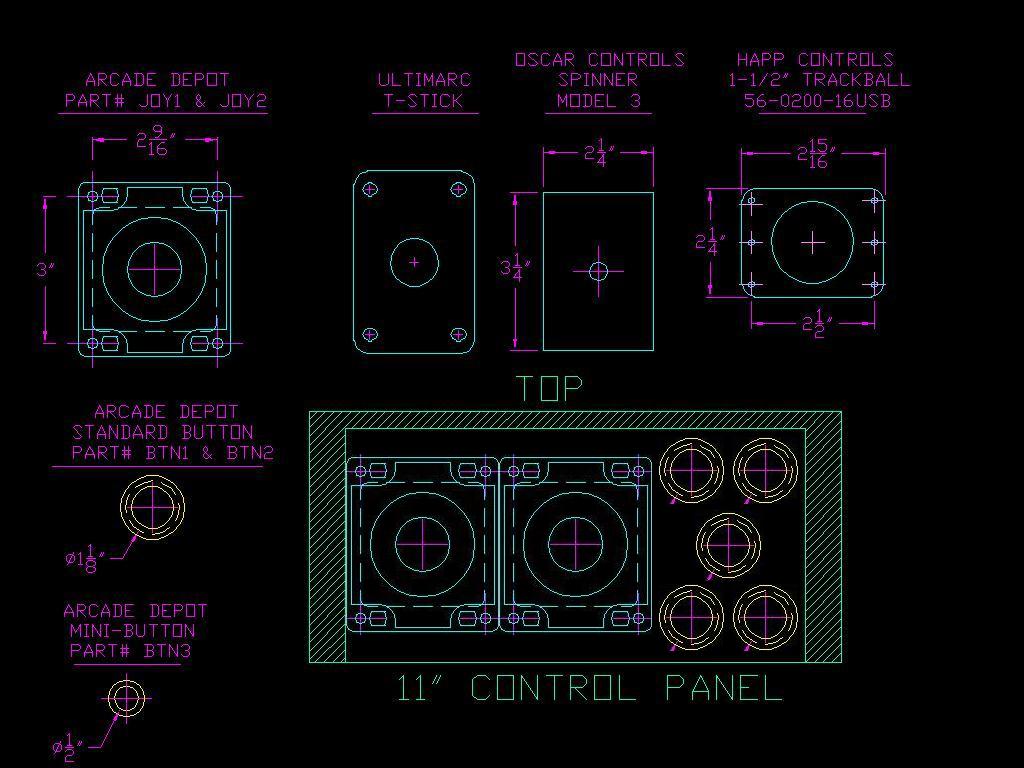
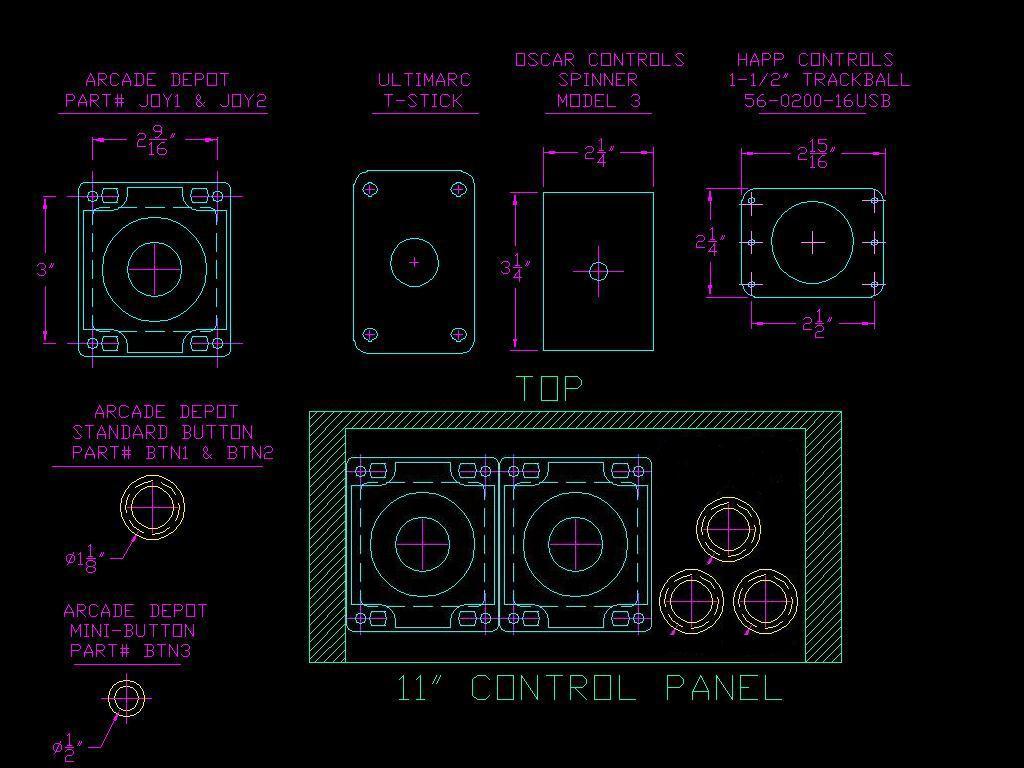
The panels are pretty straightforward. Each side has one 4-way stick, one 8-way stick and 3 fire buttons. The player 1 side has a player-1 start and player-2 start button. I went ahead and purchased the black carriage bolts (10-24 X 1-1/2 CARRIAGE BOLT BLACK OXIDE) from HappControls for the joysticks to make it look nice.
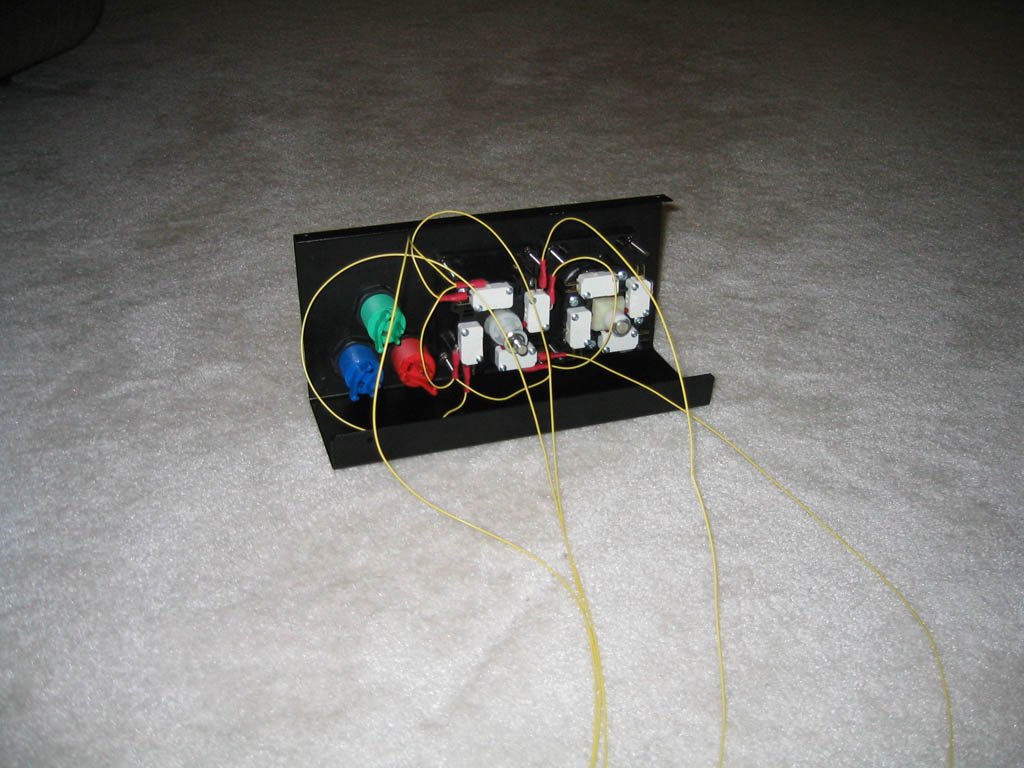
Not a lot to say here. I purchased 22-gauge wire, some female disconnects and a stripper and crimper. Each switch is comprised of a ground and the main. The I-PAC has 2 main ground connections, and of course a wiring node for each control. It was just an exercise in patience, cutting the wire, stripping it, and crimping the disconnects to the wire. The switches have these little metal spades that the female disconnects will sort of slide onto with some force. The I-PAC has small screw-down type connectors. I just made sure my wires were long enough and labeled each wire with a little sticker to indicate which control this wire was for. This labeling is essential in my case since I only had two wire colors to use (red and yellow).
Dave had used a “Smart Strip” from www.bitsltd.com. I ordered the same thing. This way, the main computer being off/on would signal to the monitor and speakers to also power off/on.
The great thing about my motherboard BIOS is that it supports the ability to power-up if you smack the space bar (or another other select keyboard presses that you can choose from). Since the Fire 3 button would be wired to the space bar, I decided I’d make that button be my Power-up button. This way, I would not have to install any special switch on the bottom of the cabinet or anything.
The only downside to this configuration is that if I lose power and get power back again, the PC will boot.
To install the power strip, I drilled a hole in the back of the cabinet near the bottom. I took apart the power strip, and cut the main power cord from the strip. This allowed me to route the power cord through the little hole. I then wired the cord back to the power strip and sealed it back up. So now, the main power cord was sticking out of a small hole on the back.
Originally I had determined I wouldn’t need a coin door. I would just put some artwork on the side of the cabinet or something. But fairly late into the process, I realized something. I had purchased little latches from arcadeshop.com which mount on the inside top of the cabinet. These are used to latch the top of the cabinet to the sides of the cabinet, so that it’s secure and doesn’t budge. Well how useful are the latches if you cant reach into the cabinet and secure the latches?
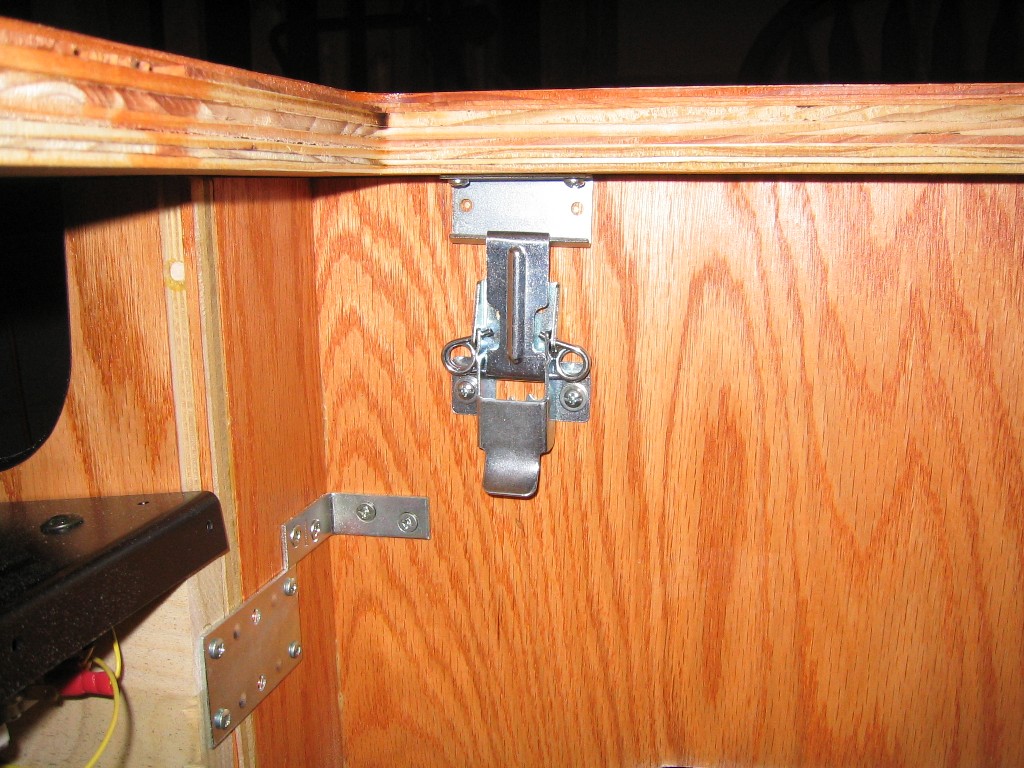
For this reason, I pretty much had to install a coin door. This way I would open the coin door, and reach inside to engage the latches.
I checked out the brand new doors which Happs offered. Nice, little pricey. I then wondered onto ebay. They had auctions for 2 excellent quality 2-player coin doors, originally manufactured in 1983. The pictures looked excellent. I had to have one so I bid high. I ended up paying around $50 for it. When it arrived, I cleaned it up a bit, and checked it over. Other than a minor piece of broken plastic on the inside, it was in excellent condition for such an old coin door. The keys to the door were put on my keychain =)
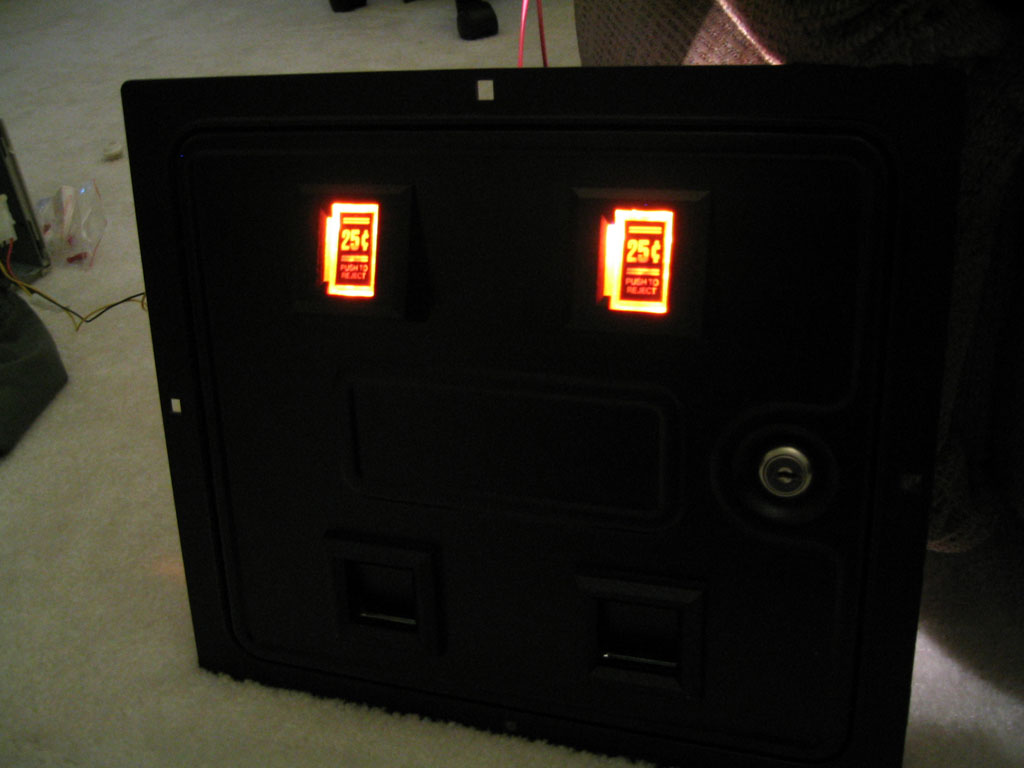
I wired the two coin door switch mechanisms directly to the COIN1, COIN2 connections on the I-PAC. So inserting quarters works!
Installation wasn’t too bad. I used a jigsaw to cut a large square out of the cabinet side, and 4 carriage bolts to secure it.
The coin door came with 2 bayonet style lamps already in it, marked “44ENG” on each lamp. It turns out they were 6.3v lamps. Not knowing this, I connected the two lamps in parallel to a 12v from my PC power supply. The lamps burned for over an hour before finally each one burned out. Well it was no big deal, I wanted to replace the incandescents with LEDs which are supposed to last for many years (as opposed to months for incandescents).
I went to superbrightleds.com and purchased a few bayonet 12v lamps of varying colors. The ones I ended up using are the 4-small red LEDs variety (BA9s-R4). The incandescents actually look better and more authentic, but I don’t want to be changing out lamps every 6 months.
Dave had setup 2 fans, one on the back for exhaust of hot air, one on the player-2 side for intake of cool air. Sounded good to me. I ordered two quiet Vantec Stealth 92mm fans from provantage.com.
I also went ahead and purchased a PCToys fan controller. This would allow me to have some control over the speed of these fans, just in case they turned out to be louder than necessary, or rotated faster than necessary.
For the fan covers, I ordered two basic black mesh 4” speaker grilles from allelectronics.com. They were very inexpensive.
For the electrical aspect of it, I used a free 12v molex connector coming from the PCs power supply and plugged this into the fan controller And the 2 fans plugged into to plugs on the fan controller itself.
Nothing fancy here. I went to Bed Bath and Beyond and bought a 3X6” utensil mesh metal box. I just attached this below the coin door on the inside to catch the Georges as they came in.
Little things like “where do I put the hard drive?” eventually come up. I figured if I could mount it to the bottom of the hinged-door side it would be out of the way. I took an Xbox jewel case (just the 1st flap) and drilled out two holes for this flat piece of plastic to hang on. Then I just mounted the hard drive directly to the jewel case piece. This ended up being an easy way of mounting the hard drive, with easy removal too. So the hard drive basically hangs on these 2 screws, and there’s a bit of Velcro also to secure it a little more.
The power strip was mounted vertically alongside the coin door.
The I-PAC was mounted right above the coin door.
The PC was secured to the bottom with industrial strength Velcro. Same for the PC subwoofer.
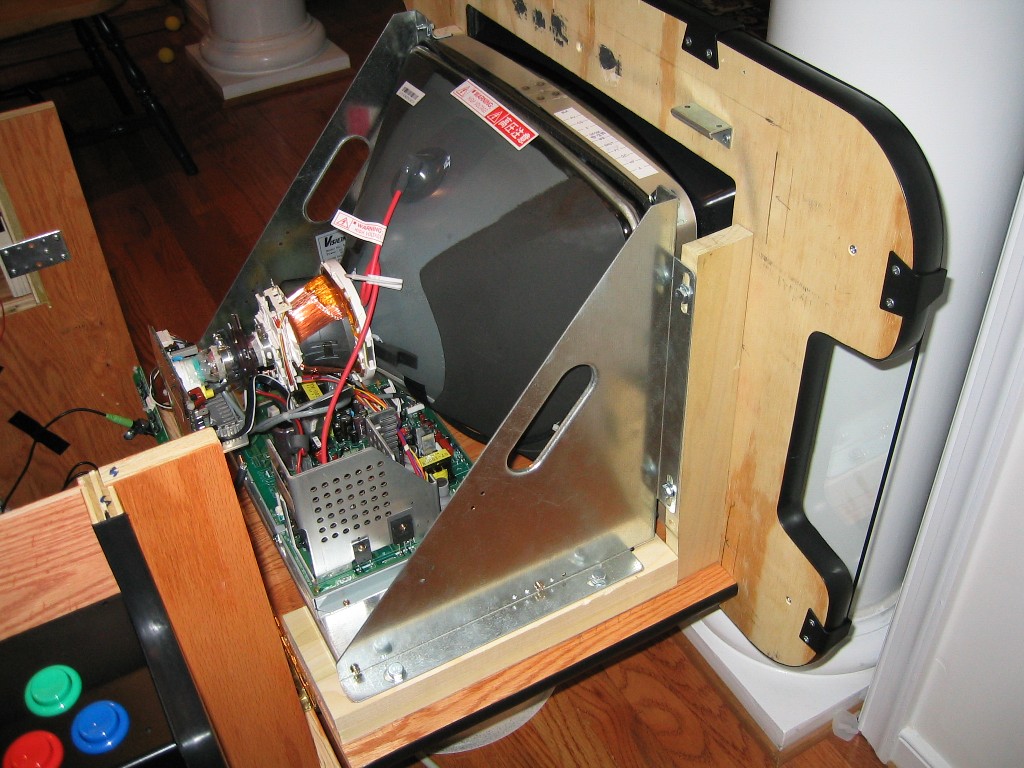
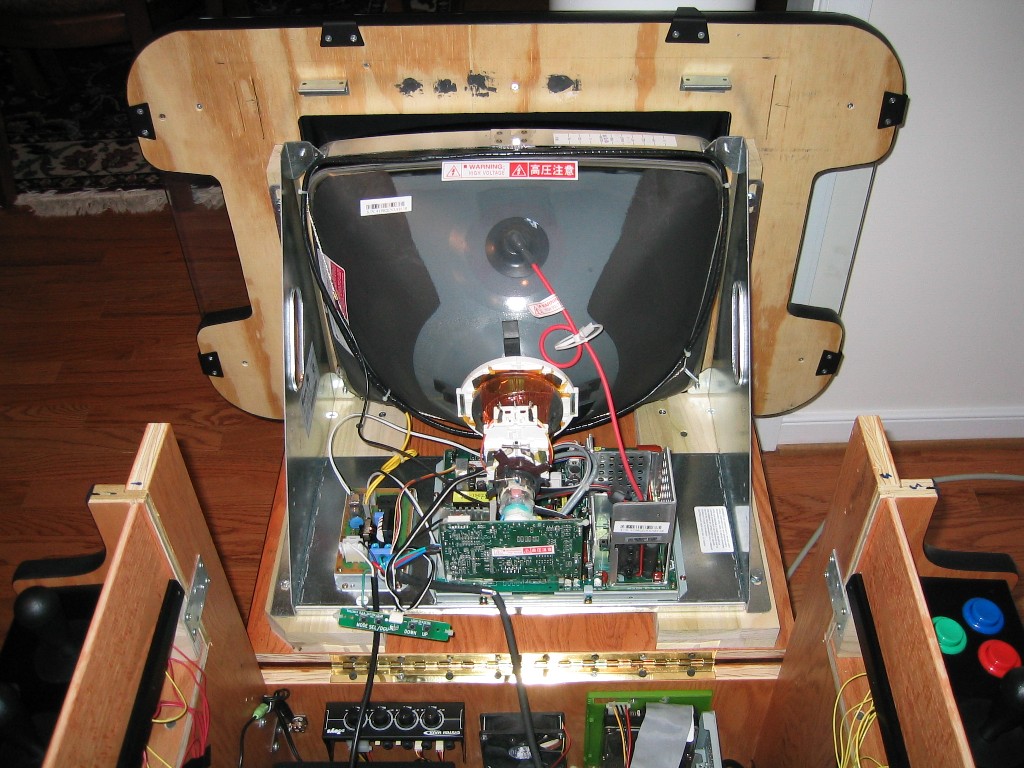
This was a pain really. It was one of the last major things I had to do. This monitor was heavy so I knew it has to be secured super securely, and it had to be centered precisely being the perfectionist that I try to be.
I opened the hinged side door and let it rest on an old plant pot, parallel to the floor. I placed the monitor in position and figured out how high it would need to be elevated from the hinged side door to align in the center of the arcade top window. As it turned out, it was pretty much exactly 2 3/4" poplar boards stacked high in height.
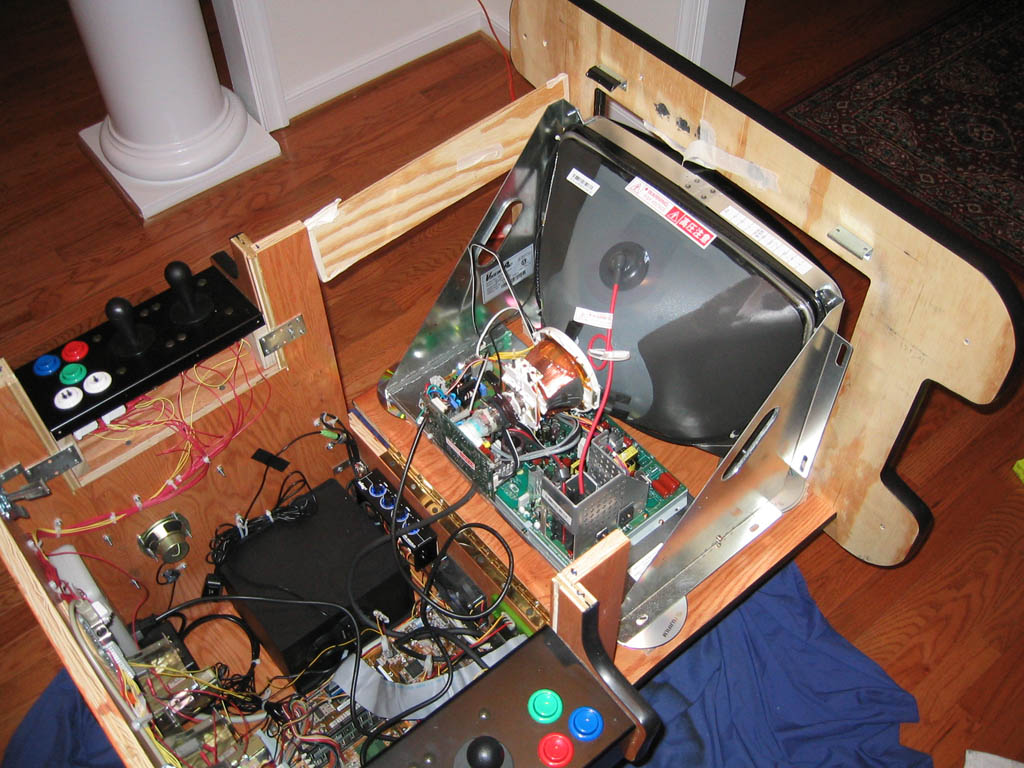
So I cut out some poplar, and then went to Lowe's and purchased some heavy duty wood screws. I then secured the 2-stacked wood pieces (I’ll refer to them as shims from now on) to the hinged door side of the cabinet. I made sure the wood screws were long enough and thick enough for the load they would have to take.
I then placed the monitor on top of these wood shims and it aligned well. I went ahead and secured the monitor to the wood shims with other bolts I had purchased, measuring things carefully to make sure the monitor was aligned on all angles. Once it was secured very well, I was able to lift the hinged door into place, with the monitor also in place. It wasn’t bolted to the arcade top yet but still it was very secure. Use of a ratchet to screw-in the bolts was essential here.
Next was the step of cutting out some wood shims which would attach the monitor to the arcade top. I measured it and it came out to 2” between the monitor and top. So I cut out some long 2” wood shims, and pre-drilled holes so I could first attach the shims to the arcade top. At a few places, when I screwed the shims to the top, I heard some splintering sounds. It turned out that the screw was separating the two pieces of the arcade top as it entered halfway through the arcade top (the arcade top is actually made of two flat pieces glued/screwed together). Just a couple of screws caused this issue, most didn’t. I didn’t take my chances in damaging the arcade top. I went ahead and screwed the wood shims to the arcade top as good as possible, without compromising the arcade top itself.
With the 2 top wood shims in place, I used bolts to secure the monitor to the shims. I was careful throughout the process to ensure the arcade top was at a 90 degree angle to the hinged side.
The wood shims are a bit bulky, but I felt it was important to have some heavy-duty shims in place, to handle the weight of the monitor.
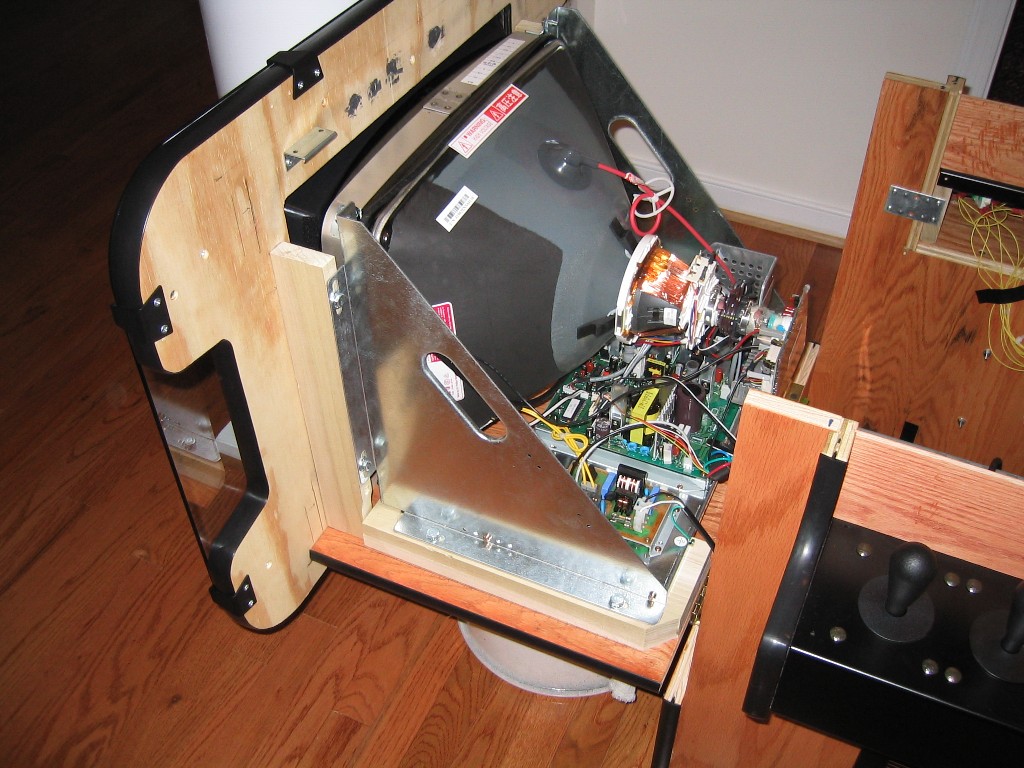
Opening the cabinet, taking care not to just fling it open and damage something takes some strength. As you open the top, you gotta support the weight of the monitor as the cabinet unfolds. Carefully lifting the top back into place is also a muscle workout.
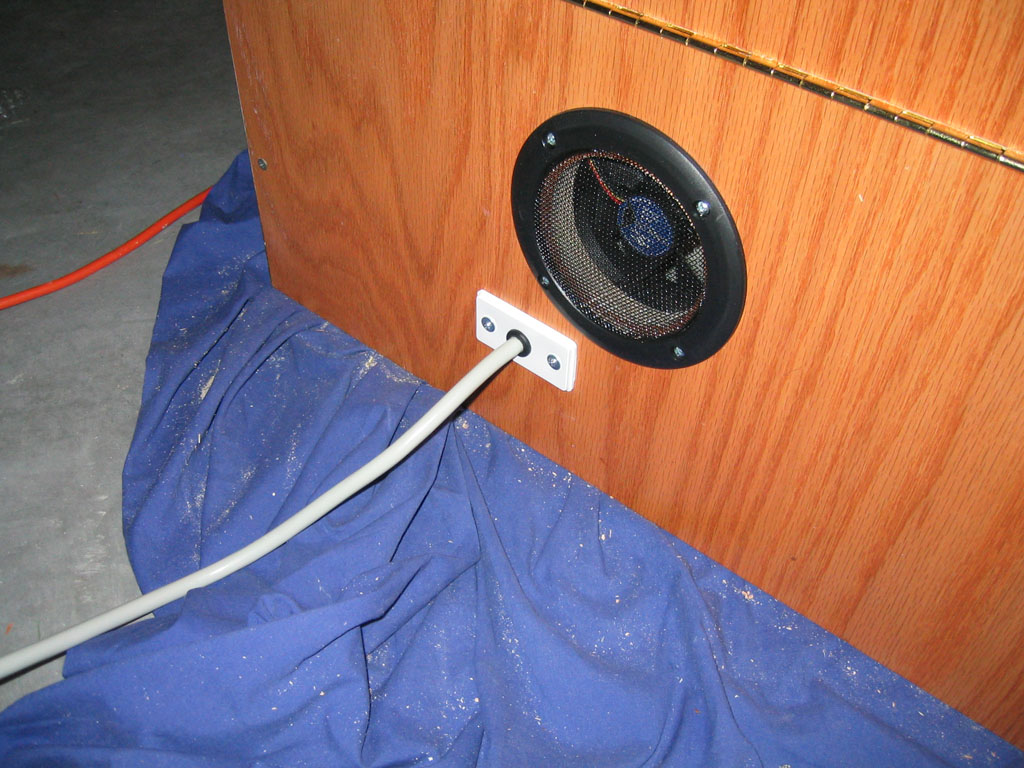
I needed a small form-factor, simple speaker system with a subwoofer. I purchased a $30 el-cheapo Creative Labs SBS350 system from CompUSA. I ended up removing the speakers from their plastic shells by brute force. This allowed me to mount the speakers themselves directly to the inside of the cabinet with 4 screws.
For the speaker covers, I ordered two 6x9 Speaker Covers (used for Midway games) from Arcadeshop.
I also ordered the 19” pre-cut monitor bezel from arcadedepot. In the end when I put it into place, I realized there was a very small gap on each end of the monitor. It wasn’t exactly flush. I ended up just sticking a thin strip of the fuzzy side of Velcro on each end of the bezel. This made it seemless.
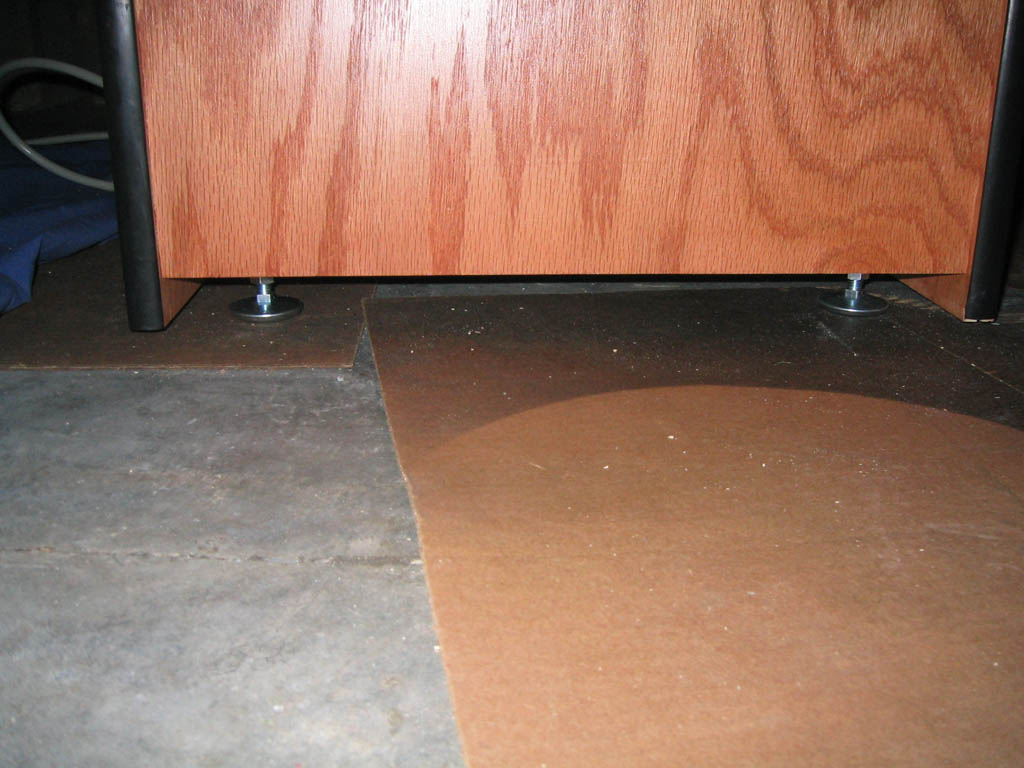
I ordered the leg levelers from Happscontrols. These little feet allow you to raise the cabinet off the ground a bit, which is true to the original cabinet design.
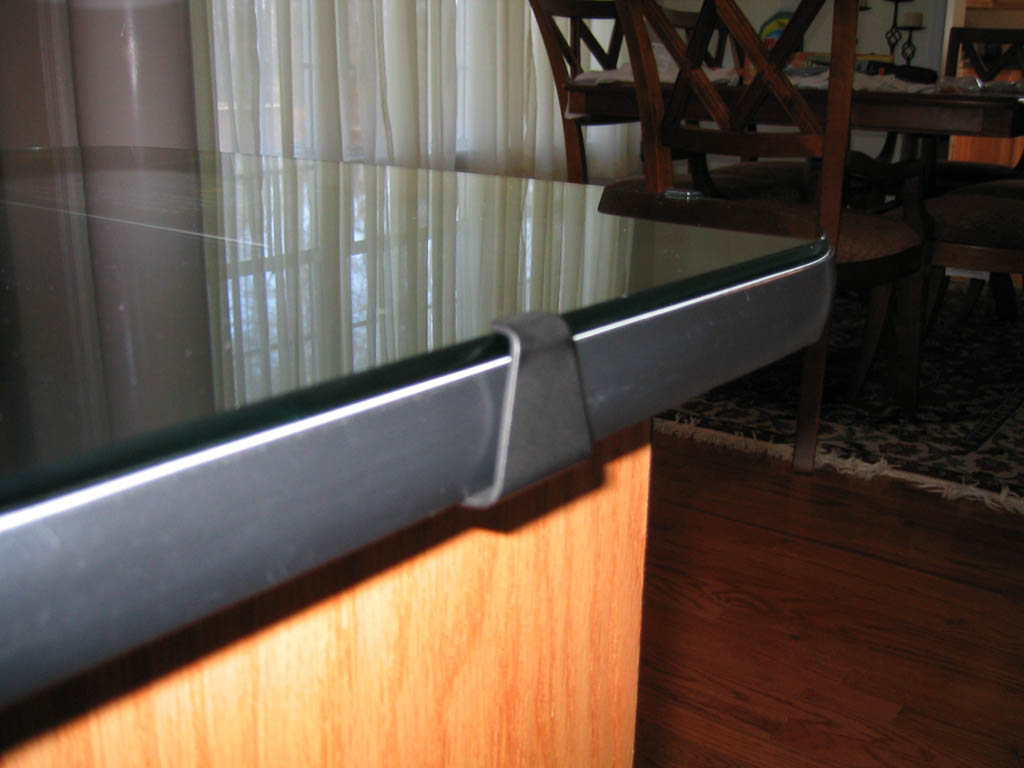
I ordered the 8-pack of black anodized cocktail glass clips from arcadedepot also. In the end, when I placed the glass top down and used the clips to try to secure the glass, the clips just didn’t reach the glass sufficiently. The T-molding, or the arcade top was just a little too big. I struggled with what I was going to do to resolve this. The glass top had to be secured well, especially when opening the cabinet top.
I finally realized that if I could bend the clips 15 degrees or so, it just might be enough to allow the clips to reach over and secure the glass well. The clips shipped at a 90 degree angle. I used some electrical tape so as to not scratch up the clips as I bent them. This ended up being the perfect solution to the problem. The clips reach over well, and provide sufficient downward pressure to clamp down the glass top quite well. Oh yeah, make sure you Windex the monitor and underside of the glass top very well before securing it down.
I wanted the power cord sticking out of the back of the cabinet to look a bit more professional. So I decided I’d purchase a little rubber grommet to fit around the cord where it comes out of the cabinet. Well, the wood is pretty thick, and I couldn’t easily find a grommet which would work well for me.
So I ended up taking a short cut. I purchased a little white plastic rectangular face plate from Lowes. It was intended for some internal-wall electrical hardware or something. I drilled out a hole in that and put a little rubber grommet in that (which fit just fine). Then I inserted the power cord through this, and mounted the face plate to the outside of the cabinet. It looks more professional; it’s not perfect, but better than just a hole in the wood. It was a little thing which really isn’t that important.
note: I ended up actually disassembling the Smart Strip, in order to cut the main AC wires from where it is soldered inside. This way, I could take off the AC cord by itself and insert it through the little hole I drilled in the cabinet. Once through the hole in the wood, I then had to rewire the AC power cord to the inside of the Smart Strip and reassemble it. This saved me from having to drill out a larger hole in the wood.
A couple of days after I had completed the project, I was making some waffles with the batter in a vessel, mixing it up. I walked over to the cabinet just to admire it, when I accidentally slipped, and the batter splattered onto the 1-player side of the cabinet, getting all over the control panel. It’s not cool when your cabinet smells like waffle batter for 2 days.
When I ordered the black carriage bolts from Happs, I didn’t order enough so I had to spend extra shipping money to get the remaining ones. This actually happened twice!
When I ordered another small two parts from Happs, I had specified on the web site to ship all items even if some were not in stock. This ended up hitting me more on shipping costs. One shipment was just a few measly carriage bolt screws!
I really should have purchased large clamps during the cabinet construction phase. This would have made the cabinet a bit more precisely constructed. This also would have helped during the monitor mounting phase.
When I was lifting out the Velcro-ed subwoofer one day, it slipped and it ended up slamming into the bottom of the volume potentiometer breaking off the connection nodes on the underside. These nodes were thankfully not vital to the operation of the potentiometer, but it was a close call.
I had installed the joysticks improperly at first, putting the little round plastic cylindrical shaped thingy at the bottom of the mechanism instead of above the stick itself. I ended up having to remove each control panel and re-install the joysticks, and it’s a pain removing those little e-clips from the bottom of the joysticks.
When I installed the cabinet-top latches, I installed them before I had installed the monitor itself. After the monitor went in, I realized the latches were hitting up against the monitor as you latched/unlatched the thing. So I had to reposition the latches about ¾ of an inch. Even after this however, the monitor was still sort of getting in the way of the latches movement, so I ended up bending the metal on the latches so that the latches stick out less when you unlatch/latch the mechanism.
When I was fooling around with the black anodized cocktail glass clips, I had screwed them with these fairly small screws. Upon removing some of the screws, a couple of the screws themselves broke leaving half the screw in the wood. This isn’t my fault really, but frustrating.
Well this thing was expensive. Here’s the breakdown. Most of the important things are accounted for here.